How to Factory Reset MacBook Step by Step Without Losing Important Data or Facing Errors?
Wiping a computer clean can feel like a daunting task. Whether your machine is slowing down after years of loyal service, experiencing stubborn software glitches, or being prepared for a new owner, learning how to factory reset MacBook systems properly ensures your digital footprint is erased safely without sacrificing your indispensable files.
A factory reset isn’t just about hitting a delete button. It involves a systematic approach: safeguarding your current files, de-authorizing your premium accounts, wiping the internal storage securely, and reinstalling a fresh copy of the macOS operating system. If skipped or executed out of order, you risk losing irreplaceable photos, locking yourself out of vital software licenses, or encountering frustrating system errors during the re-installation process.
This comprehensive, highly detailed guide will walk you through the entire process from start to finish. We will cover both modern Apple Silicon architectures and older Intel-based hardware, ensuring that no matter which MacBook model sits on your desk, you can complete this transition smoothly and confidently.
Why Factory Reset Your MacBook? Understanding the Benefits and Scenarios
Before diving into the technical steps, it is valuable to examine why and when a complete system wipe is necessary. Returning a computer to its original, out-of-the-box state serves several practical purposes.
1. Preparing for Sale, Trade-In, or Gifting
If you plan to sell your MacBook, trade it in to Apple, or pass it along to a family member, a factory reset is mandatory. Your laptop contains cached credentials, browsing history, private communications, and financial logs. A comprehensive reset ensures that your personal data remains strictly yours, preventing unauthorized access while offering the next user a clean, welcoming setup screen.
2. Resolving Persistent System Sluggishness
Over years of continuous use, operating systems accumulate digital debris. Deeply embedded system caches, leftover files from uninstalled applications, corrupted launch daemons, and fragmented directories can bog down even high-end hardware. When standard optimization utilities fail to restore snappiness, a fresh installation strips away the bloatware, maximizing processing efficiency.
3. Fixing Severe Software Corruption and Malware
While macOS is renowned for its robust UNIX-based security infrastructure, it is not entirely immune to deep-rooted configuration errors or rogue scripts. If a software update fails catastrophically midway through, or if you accidentally install persistent adware that resists standard removal tools, erasing the drive completely severs the root of the problem.
Summary: Benefits vs. Drawbacks of a Factory Reset
To help you weigh whether this process is ideal for your current situation, consider this comparative overview:
| System Attribute | Benefits of a Reset | Drawbacks & Challenges |
| Performance | Restores optimal processing speeds and cleans deep disk fragmentation. | Requires time to re-download heavy apps and re-configure preferred system preferences. |
| Storage Capacity | Reclaims gigabytes of forgotten “System Data” and hidden developer caches. | Completely purges all local storage; unbacked data is permanently unrecoverable. |
| Security & Privacy | Erases browser tokens, saved passwords, and personal encryption keys before transfer. | Requires careful de-authorization of iCloud and Find My to avoid permanent Activation Locks. |
| System Stability | Eliminates corrupt kernel extensions and broken background daemons. | If interrupted by a poor internet connection, it may require advanced troubleshooting. |
Phase 1: Pre-Reset Checklist (Crucial Safeguards to Prevent Data Loss)
The actual process of erasing your Mac is remarkably quick. The real work lies in preparation. If you do not methodically back up your files and sign out of integrated services, you could lock yourself out of your accounts or permanently lose access to proprietary licenses. Follow these preparatory steps closely.
1. Execute a Comprehensive Time Machine Backup
Never assume your data is fully synced to cloud providers like Google Drive or Dropbox. A physical, external backup is your ultimate safety net.
-
Connect an external hard drive or SSD with sufficient storage capacity to your MacBook.
-
Navigate to System Settings (or System Preferences on older macOS versions) > General > Time Machine.
-
Click Add Backup Disk and select your connected external drive.
-
Select Back Up Now from the Time Machine menu item in the top menu bar.
-
Wait patiently until the progress bar completes entirely. For drives with hundreds of gigabytes of data, this can take several hours. Ensure your MacBook remains connected to its power adapter throughout the process.
2. De-authorize Your Accounts (iTunes and Music)
Apple limits the number of computers that can simultaneously stream or play content tied to your specific Apple ID account (typically capped at 5 authorized machines). Failing to de-authorize your device before wiping it leaves a ghost placeholder on Apple’s authentication servers.
-
Open the Apple Music or TV app.
-
In the top menu bar, click on Account > Authorizations.
-
Select De-authorize This Computer….
-
Input your Apple ID credentials to confirm the removal.
3. Explicitly Sign Out of iCloud and Apple ID
Leaving your Apple ID actively linked to a machine you intend to erase can trigger an Activation Lock. This security feature prevents an unauthorized person from setting up a stolen device. If a new owner boots up a Mac with an active lock, they will be blocked by a login screen demanding your password.
-
For macOS Ventura, Sonoma, Sequoia, and Later: Open System Settings, click on your name/Apple ID profile at the very top of the left sidebar, scroll down to the absolute bottom of the right pane, and click Sign Out.
-
For macOS Monterey and Earlier: Open System Preferences, click on Apple ID, navigate to the Overview tab, and select Sign Out.
-
When prompted whether you wish to keep a copy of your iCloud data on the local drive, you can safely uncheck the boxes, as your primary data is already secured on your external Time Machine backup.
4. Unpair Bluetooth Peripherals (Optional but Recommended)
If you are passing your MacBook to someone living in the same household (like a spouse or child), your nearby Bluetooth mouse, keyboard, or wireless headphones might continuously attempt to connect to the old Mac even after it changes hands.
-
Go to System Settings > Bluetooth.
-
Hover over your paired devices (Magic Mouse, AirPods, etc.), click the information (i) icon or the cross button, and select Forget Device.
Phase 2: How to Factory Reset MacBook (The Two Modern Methods)
Apple completely redesigned the system architecture of the Mac with the introduction of its custom ARM-based chips (M1, M2, M3, and M4 families) alongside the T2 Security Chip found in late-stage Intel models. Because of this, there are now two radically different ways to reset a MacBook.
We will explore the modern “Erase Assistant” method first, followed by the traditional macOS Recovery approach.
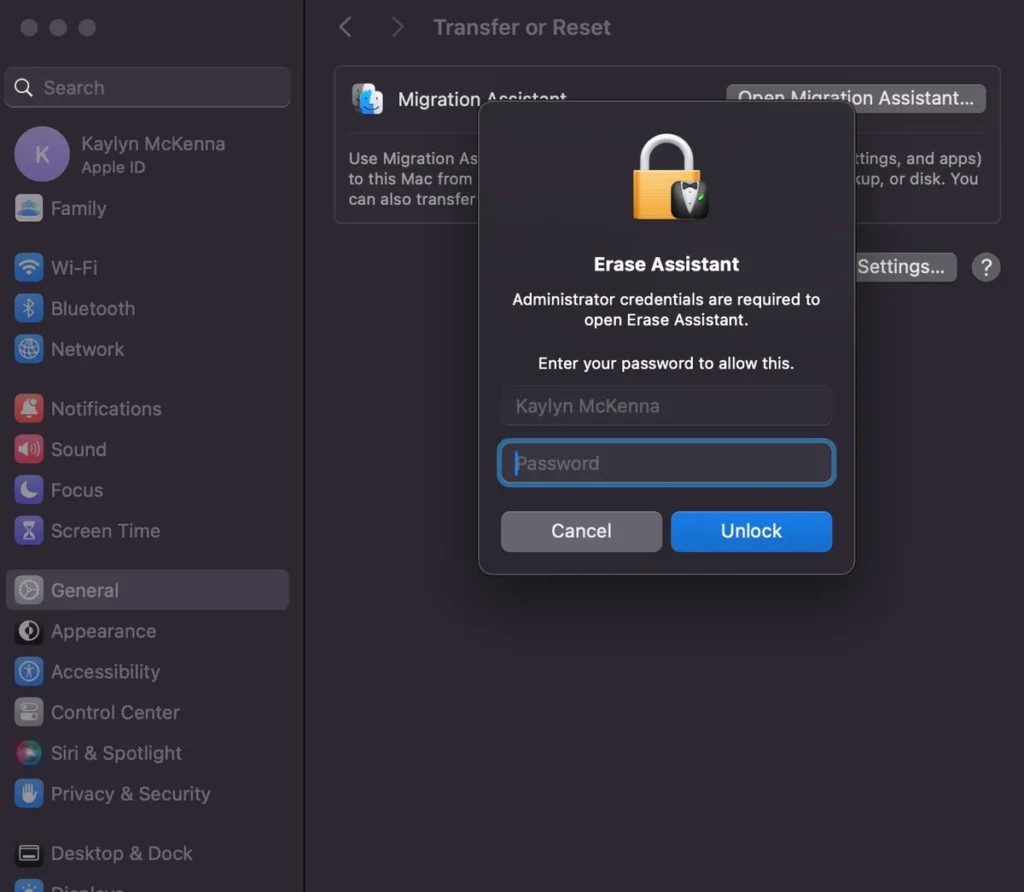
Method A: Using “Erase All Content and Settings” (For Apple Silicon & Intel T2 Macs)
If your MacBook runs on Apple Silicon or is an Intel-based model featuring the Apple T2 Security Chip, and you are running macOS Monterey or newer, Apple provides a built-in feature identical to the reset workflow found on iPhones. This tool wipes user data and cryptographic keys immediately without deleting the base operating system, eliminating the need to re-download gigabytes of macOS installation files.
Step 1: Open the Erase Assistant
-
Click the Apple Logo in the top-left corner of your display.
-
Select System Settings (or System Preferences).
-
If you are on macOS Ventura or newer: Navigate to General > Transfer or Reset. Then, click the Erase All Content and Settings button.
-
If you are on macOS Monterey: Open the System Preferences menu bar option at the top of the screen next to the Apple logo, and select Erase All Content and Settings directly from the dropdown.
[Apple Menu] ➔ [System Settings] ➔ [General] ➔ [Transfer or Reset] ➔ [Erase All Content and Settings]
Step 2: Provide Administrative Authentication
-
A prompt will appear requiring your administrator account password (the password you use to unlock your laptop daily). Enter it and click OK.
Step 3: Review the Data Removal Summary
-
The Erase Assistant will display a detailed breakdown of everything that will be permanently purged. This list includes your active Apple ID profile, Touch ID biometric data, cryptographic accessory keys, Find My location tracking tracking tokens, and file system structures.
-
Click Continue if you are fully satisfied with your backups.
Step 4: Finalize the Wiping Process
-
A final, high-contrast warning pop-up will ask you to confirm your intent. Click Erase All Content & Settings.
-
Your MacBook display will turn black, and the computer will restart automatically.
-
During bootup, you may see a progress bar underneath an Apple logo or a prompt asking you to connect to a Wi-Fi network to activate the Mac.
-
Once activation succeeds, the computer will load into the familiar, multi-lingual Setup Assistant welcoming screen. If you are selling the device, shut down the Mac right here (hold Command + Q or press the power button) so the new owner can enter their own information.
Method B: The Classic macOS Recovery Approach (For Legacy Intel MacBooks)
If you own an older Intel-based MacBook without a T2 security chip, or if your operating system predates macOS Monterey, the modern Erase Assistant is unavailable. To achieve a clean slate, you must boot into a separate, isolated partition known as macOS Recovery Mode to manually format the solid-state drive and download a fresh copy of the OS.
Step 1: Trigger the Recovery Key Combination
-
Shut down your MacBook completely. Wait about 10 seconds until all internal fans fall silent and the screen indicator lights turn off completely.
-
Press the Power Button once, and immediately press and hold down one of the following key combinations on your internal keyboard:
Command (⌘) + R: This installs the exact version of macOS that was last active on your Mac before starting the reset, without upgrading to newer iterations.
Option (⌥) + Command (⌘) + R: This upgrades your machine automatically to the highest, most secure version of macOS that your specific MacBook hardware formally supports from Apple’s servers.
-
Keep these keys pressed down firmly until you see an animated spinning globe or an Apple logo appearing on screen. Once the progress bar begins filling, you can release the keys.
Step 2: Authenticate and Launch Disk Utility
-
If prompted, choose a user account you know the password for, click Next, and provide the corresponding administrator password.
-
The main macOS Utilities control window will load onto the screen. Select Disk Utility from the vertical list and click Continue.
Step 3: Format the Internal Storage Drive Correctly
-
In the left sidebar of the Disk Utility interface, select your primary internal drive. By default, Apple names this volume Macintosh HD.
-
Click the Erase button located in the top horizontal toolbar of the Disk Utility window.
-
A settings dialog box will appear requiring specific format designations:
-
Name: Leave it as Macintosh HD (or customize it if desired).
-
Format: Select APFS if you are running modern macOS editions (macOS High Sierra or newer). For significantly older operating systems, select Mac OS Extended (Journaled).
-
-
Click Erase Volume Group (or just Erase if the volume group button isn’t visible).
-
Once the format sequence finishes completely, close the Disk Utility app window by clicking the red circle in the top-left corner to return to the primary Recovery menu.
Step 4: Reinstall a Clean Copy of macOS
-
Back on the main macOS Utilities dashboard, select Reinstall macOS (the icon matches the artwork of the operating system version you are installing) and click Continue.
-
Follow the on-screen prompts, accept the software licensing agreements, select your freshly formatted Macintosh HD storage drive as the installation target, and click Install.
-
Keep your MacBook lid wide open and plugged into a wall outlet. The laptop will download several gigabytes of data and may reboot multiple times. Do not put the computer to sleep or force close it during this critical stage.
Troubleshooting Common Errors During the Reset Process
Even when following directions explicitly, hardware quirks or network fluctuations can occasionally throw error messages into the mix. Understanding how to bypass these obstacles keeps the reset process moving along smoothly.
1. The Prohibitory Symbol or Flashing Question Mark Folder
If your Intel Mac restarts into a screen showing a gray folder with a flashing question mark, it means the system cannot find a viable local operating system file path to boot from. This happens if you accidentally erase your drive but break your internet connection before the re-installation phase begins.
-
The Fix: Shut down the computer completely. Hold down Option + Command + R while powering it back on. This forces the hardware to bypass internal storage altogether and launch Internet Recovery mode directly over your local Wi-Fi router.
2. “An Error Occurred While Preparing the Installation”
This message frequently appears when the internal system clock inside your MacBook falls completely out of sync with Apple’s remote verification servers. This mismatch causes security certificates to flag the incoming macOS download as expired or invalid.
-
The Fix: While still inside Recovery Mode, click Utilities in the top menu bar and launch the text-based Terminal application. Type the following command exactly as shown and press Enter:
ntpdate -u time.apple.comIf that command throws a permission error, you can manually override the system date by typing
date mmddHHMMyy(representing Month, Day, Hour, Minute, and Year). For example, to set the clock to June 9, 2026, at 12:30 PM, you would input:date 0609123026Close Terminal and restart the installation path.
3. Verification Failed or Account Sign-out Errors
If your MacBook refuses to let you log out of iCloud during Phase 1, it is usually tied to a network timeout or a conflict with older local file vaults.
-
The Fix: Restart your router, or attempt to connect your Mac to an alternative network, such as a mobile hotspot. If it still fails, you can log into your profile on another device via iCloud.com, navigate to Find Devices, select your specific MacBook from the hardware list, and click Remove from Account remotely.
Post-Reset Strategy: How to Restore Your Data or Reconfigure for a New Owner
Now that the factory reset is complete, your next steps depend entirely on what you intend to do with the MacBook.
Scenario A: Retaining the Device for Yourself
If you performed the reset to clear out clutter and restore performance, you will need to walk through the initial configuration steps to bring your personal data back onto the machine safely.
-
Select your language, connect to Wi-Fi, and sign back in using your Apple ID.
-
When the system asks if you want to transfer information from another computer or backup, choose From a Mac, Time Machine backup, or Startup disk.
-
Plug in the external hard drive containing your Phase 1 Time Machine backup.
-
Select the latest backup snapshot, choose precisely what you want to restore (e.g., your complete user account profile, specific system settings, or just raw applications), and let the migration wizard copy the files back safely.
Scenario B: Handing the Computer Over to Someone Else
If the MacBook is changing hands, your work is effectively done once the language selection screen loads.
-
Press Command + Q on the welcome screen.
-
Click Shut Down.
-
The next time the laptop lid is lifted, the computer will safely guide the new owner through a completely independent setup process, ensuring they cannot access any trace of your past files or profile structures.
Frequently Asked Questions (FAQs)
Does a factory reset delete all my files permanently?
Yes. When you execute a factory reset, the file directories and encryption keys are cleared from the storage architecture. While data recovery specialists can occasionally pull remnants from old magnetic spinning hard drives, modern Solid State Drives (SSDs) utilize technology like TRIM commands that render deleted files completely unrecoverable once erased. Always double-check your backups.
How long does it take to factory reset a MacBook?
If you are using a modern Apple Silicon Mac running the Erase Assistant feature, the process takes less than 5 to 10 minutes. If you are operating an older Intel model using Internet Recovery, the timeline scales heavily based on your home network bandwidth. Downloading the multi-gigabyte macOS recovery package over slow Wi-Fi can extend the process to 1 to 2 hours.
Can I factory reset my MacBook if the keyboard or screen is broken?
Yes, though it requires external peripheral hardware. You can connect a standard external USB keyboard to register the necessary recovery key combinations during startup. If your display is cracked or unresponsive, connect the MacBook to an external desktop monitor or television using an HDMI cable or USB-C adapter, and close the laptop lid immediately after powering it on to force video signal output to the secondary screen.
Will a factory reset downgrade my operating system version?
It depends on how you launch Recovery Mode. If you use the Erase Assistant on modern Macs, your operating system version stays exactly the same. On older Intel machines, holding Command + R keeps your current version, while using Shift + Option + Command + R attempts to reinstall the specific macOS version that originally shipped pre-installed on your laptop from the factory.
Conclusion: Take Control of Your Mac’s Lifecycle
Successfully executing a factory reset on your MacBook is an incredibly empowering technical skill. By approaching the task methodically—backing up critical files via Time Machine, cleanly signing out of proprietary Apple ID ecosystems, and selecting the correct format commands for your specific hardware generation—you protect your privacy while restoring your device to peak performance.
Whether your goal is to breathe fresh life into an aging laptop, resolve deep-seated system bugs, or transition ownership smoothly, following this guide safeguards your data and keeps your hardware running flawlessly. For readers who enjoy maintaining a completely optimized setup across all their home technology products, keeping your computing infrastructure clean is just as vital as managing other household tech devices efficiently. If you find yourself regularly working with hardware configurations, optimizing peripherals, or tinkering with custom setups like a mobile triple screen setup simracing arrangement, a clean, high-performing computer serves as the baseline for all your technical endeavors.
Related posts:
![How to Fix Screen Problems on a MacBook Pro]()
How to Fix Screen Problems on a MacBook Pro and Restore Normal Display Performance
![How to Fix MacBook Pro Screen Burn Marks and Restore Display Quality?]()
How to Fix MacBook Pro Screen Burn Marks and Restore Display Quality?
![Microsoft Surface Laptop 3 Screen Crack: ifixit.org.uk]()
Microsoft Surface Laptop 3 Screen Crack: Comprehensive Guide to Causes, Repair Options, and Preventi...
![How to Fix a MacBook That Won't Turn On? A Complete Troubleshooting Guide]()
How to Fix a MacBook That Won't Turn On? A Complete Troubleshooting Guide
![How To Fix Sticky Keyboard Keys on a MacBook]()
How To Fix Sticky Keyboard Keys on a MacBook: A Complete Step-by-Step Guide
![How Can You Block Ads on PC, Android, and iPhone Devices Effectively]()
How Can You Block Ads on PC, Android, and iPhone Devices Effectively? (2026 Guide)
![ifixit.org.uk]()
Surface Laptop 3 Cracked Screen? Top 7 Fixes & Prevention Tips
![Why Is My Laptop Running Slow and How Can I Improve Performance]()
Why Is My Laptop Running Slow and How Can I Improve Performance?