Introduction
Few things are more frustrating than sitting down to work on your MacBook Pro only to be greeted by a flickering screen, strange lines, or—worst of all—a completely black display. Your MacBook Pro is a significant investment, and display issues can bring your productivity to a screeching halt. Whether you’re dealing with a cracked screen, persistent glitches, or the dreaded “stage light” effect, understanding how to fix screen problems on a MacBook Pro is essential for every Mac user.
The good news is that not all display issues require expensive professional repairs. Many screen problems can be resolved with simple troubleshooting steps you can perform at home. For more serious hardware failures, there are clear paths forward—from DIY replacements using quality parts to professional repair services.
This guide draws on expert repair knowledge from iFixit, Apple’s official support documentation, and real-world user experiences to provide you with a complete roadmap for diagnosing and resolving MacBook Pro display issues. Let’s dive in.
Understanding Common MacBook Pro Screen Problems
Before you can fix screen problems on a MacBook Pro, you need to identify what you’re dealing with. Display issues generally fall into two categories: software-related glitches and hardware failures.
Software-Related Display Issues
Software problems are often the easiest to resolve. These include:
-
Screen flickering after a macOS update
-
Display artifacts or glitching when running specific applications
-
Lines appearing on the screen that disappear after a restart
-
Brightness or color issues that change with system settings
Hardware-Related Display Issues
Hardware problems are more serious and typically require physical intervention:
-
Cracked or shattered glass from drops or impacts
-
Dead pixels or permanent lines on the screen
-
The “stage light” effect—dark bands at the bottom of the display
-
Screen going black when opened past a certain angle (often a Flexgate issue)
-
Water damage spots or discoloration
The Screenshot Test: A Critical Diagnostic Tool
One of the most valuable diagnostic techniques is the screenshot test. Take a screenshot of your screen (Shift + Command + 4). If the lines or artifacts appear in the screenshot file when viewed on another device, the problem is software or GPU-related. If the screenshot looks perfect elsewhere, the issue lies with your physical display hardware. This simple test can save you hours of unnecessary troubleshooting.
Step-by-Step Guide: How to Fix Screen Problems on a MacBook Pro
Quick Software Fixes to Try First
1. Restart Your MacBook Pro
It sounds almost too simple, but restarting your Mac can resolve a surprising number of display issues. A clean restart resets the Windows Server state, GPUs, and drivers. If the lines or flickering disappear after a restart and stay gone, you were dealing with a transient software glitch.
2. Update macOS and Your Apps
Apple frequently releases updates that include fixes for graphics-related bugs. Navigate to System Settings > General > Software Update to check for available updates. Additionally, update resource-intensive applications like Chrome, Adobe Creative Cloud apps, and Zoom, which can sometimes trigger rendering quirks.
3. Disable True Tone and Dark Mode
True Tone, which adjusts your display’s color temperature based on ambient light, can occasionally cause flickering issues on MacBooks released in 2018 or newer. To disable it:
-
Go to System Settings > Displays
-
Toggle off True Tone
Similarly, Dark Mode has been known to cause screen glitching on some systems. Try switching to Light Mode under System Settings > Appearance.
4. Reset NVRAM/PRAM (Intel-based Macs)
For Intel-based MacBook Pro models, resetting NVRAM (non-volatile random-access memory) or PRAM (parameter RAM) can resolve display resolution, color profile, and video setting issues. To do this:
-
Shut down your Mac
-
Turn it on and immediately press and hold Option + Command + P + R
-
Hold for about 20 seconds, then release
5. Reset SMC (Intel-based Macs)
The System Management Controller (SMC) manages power-related functions, including display backlighting. Resetting the SMC can resolve issues like a black screen or backlight problems. The reset process varies by model, so consult Apple’s official guidance for your specific MacBook Pro.
6. Boot into Safe Mode
Booting into Safe Mode disables third-party extensions and login items that may be causing display conflicts. On Apple Silicon Macs, press and hold the power button until “Options” appears, then select your startup disk while holding Shift. On Intel Macs, press and hold Shift immediately after turning on your Mac until the login window appears. If the lines vanish in Safe Mode, third-party software is likely the culprit.
Hardware-Related Screen Problems and Solutions
When software fixes don’t resolve the issue, you’re likely dealing with a hardware problem. Here’s how to fix screen problems on a MacBook Pro caused by physical damage or component failure.
Diagnosing Hardware Issues
Common hardware-related symptoms include:
-
Vertical or horizontal lines or bands: When both vertical and horizontal lines appear simultaneously, it’s highly likely related to a display crack
-
Black lines or dark patches: Often indicate a damaged LCD panel or cable issue
-
Stage light effect: Dark bands at the bottom of the screen suggest damaged backlight LED traces
-
Screen only works at certain angles: Classic symptom of a frayed or damaged display flex cable (Flexgate)
Flexgate: The Display Cable Problem
The term “Flexgate” refers to a design flaw affecting certain MacBook Pro models where the display flex cable becomes damaged over time due to repeated opening and closing. Symptoms include the screen going black when opened past a certain angle or the “stage light” effect appearing at the bottom of the display.
If you’re experiencing these symptoms, the display cable or the entire display assembly may need replacement. For some models, Apple has offered repair programs, so check if your device qualifies.
DIY Screen Replacement: What You Need to Know
For those comfortable with electronics repair, replacing a damaged screen yourself can save hundreds of pounds compared to Apple’s repair costs. However, it’s not a project for the faint-hearted.
Preparation
Before starting any repair, take these essential safety steps:
-
Discharge the battery below 25% before disassembling your MacBook. A charged battery may catch fire if accidentally damaged during the repair
-
Completely power off and unplug your MacBook Pro
-
Work in a clean, well-lit space and keep track of every screw you remove
-
Check for a swollen battery and take appropriate precautions if present
Tools You’ll Need
Based on iFixit repair guides, you’ll typically need:
-
P5 Pentalobe screwdriver
-
T3 or T8 Torx drivers
-
Suction handle or suction cup
-
Spudger (plastic pry tool)
-
Tweezers
-
FixMat or similar magnetic mat for organizing screws
The Replacement Process
While the exact steps vary by model, the general process for screen replacement includes:
-
Remove the lower case using a P5 Pentalobe driver to access internal components
-
Disconnect the battery to prevent electrical shorts
-
Remove the display assembly by releasing hinges and disconnecting cables
-
Install the new display assembly and reassemble in reverse order
-
Calibrate the replacement screen using Apple’s Repair Assistant (requires macOS Tahoe 26 or later and an internet connection)
Important Considerations for DIY Repair
-
Genuine vs. aftermarket screens: iFixit and most other resellers offer high-quality aftermarket replacements rather than genuine Apple screens
-
Calibration requirements: True Tone and auto-brightness may be disabled until calibration, and non-genuine screens may not regain these functions
-
Serialization: With macOS Tahoe 26.1 and higher, there’s a “repair” function in Settings that allows most screens to calibrate correctly
-
Cost: Replacement displays typically range from $350-$500 USD depending on the model
Professional Repair Options
If DIY repair isn’t for you, consider these alternatives:
Apple Authorised Service Providers: Official repairs using genuine Apple parts, but often the most expensive option. Apple quotes for screen replacement can exceed $800 for newer models.
Independent Repair Shops: Often more affordable than Apple while still offering quality service. Look for shops with good reviews and experience with MacBook repairs.
Mail-in Repair Services: Companies like iFixit offer repair services where you can send in your device.
Cost Comparison: Repair Options
| Option | Estimated Cost | Pros | Cons |
|---|---|---|---|
| DIY Replacement | $350-$500 | Most affordable, satisfying to do yourself | Time-consuming, risk of further damage, no warranty on workmanship |
| Independent Shop | $400-$700 | Professional installation, often includes warranty | Quality varies, may not use genuine parts |
| Apple Service | $600-$900+ | Genuine parts, guaranteed quality | Most expensive, longer wait times |
| AppleCare+ | Service fee only | Lowest out-of-pocket cost | Requires pre-purchased coverage |
Preventing Future Screen Problems
Once you’ve learned how to fix screen problems on a MacBook Pro, take steps to prevent them from recurring:
Protective Measures
-
Use a screen protector: A quality screen protector can absorb minor impacts and prevent scratches
-
Invest in a protective case: A hardshell case provides cushioning against drops
-
Close the lid gently: The display flex cable can wear out from aggressive opening and closing
Maintenance Best Practices
-
Keep your Mac cool: Heat can damage internal components, including the GPU and display
-
Clean dust from vents: Dust buildup blocks airflow and causes overheating
-
Handle with care: The MacBook Pro display is delicate—avoid pressing on the screen or placing heavy objects on the closed lid
-
Keep liquids away: Water damage is a leading cause of display failure
Software Maintenance
-
Keep macOS updated: Apple regularly releases patches for graphics glitches
-
Clear system junk regularly: Corrupted caches can sometimes cause rendering issues
-
Monitor GPU temperature: Use system monitoring tools to keep an eye on GPU health
When to Replace vs. Repair Your MacBook Pro
Deciding whether to fix screen problems on a MacBook Pro or replace the entire machine depends on several factors:
Consider Repair If:
-
Your MacBook Pro is relatively new (less than 3-4 years old)
-
The repair cost is significantly less than a replacement
-
You’re satisfied with the performance of your current model
-
The screen issue is the only problem with your device
Consider Replacement If:
-
Your MacBook Pro is older than 5-6 years
-
The repair cost approaches 50% or more of the device’s value
-
You’re experiencing multiple hardware failures
-
You need the performance improvements of a newer model
The AppleCare+ Factor
If you have AppleCare+ coverage, screen repairs are subject only to a service fee rather than the full replacement cost. This makes professional repair a much more attractive option.
Frequently Asked Questions
Why is my MacBook Pro screen flickering after updating macOS? Software conflicts between the new operating system and graphics drivers can cause flickering. Try resetting NVRAM, disabling True Tone, or booting into Safe Mode.
Can a cracked MacBook Pro screen be repaired without replacement? In most cases, no. Cracked LCD panels typically require complete display assembly replacement.
How much does it cost to fix a MacBook Pro screen? Costs range from $350 for a DIY replacement to over $900 for Apple service, depending on your model and chosen repair method.
Will a third-party replacement screen work with True Tone? Most third-party (OEM) displays can calibrate correctly with macOS Tahoe 26.1 and higher, but non-genuine screens may not regain True Tone and auto-brightness functionality.
What is the “stage light” effect on a MacBook Pro? The stage light effect appears as dark bands at the bottom of the screen, typically caused by damaged backlight LED traces—a common issue in certain MacBook Pro models.
How do I know if my screen problem is software or hardware? Use the screenshot test: if lines appear in screenshots viewed on another device, it’s a software issue. If screenshots look clean but your screen shows problems, it’s hardware.
Conclusion
Learning how to fix screen problems on a MacBook Pro is an essential skill that can save you time, money, and frustration. From simple software fixes like restarting and updating macOS to more complex hardware solutions like display replacement, there are multiple paths to restoring your MacBook Pro’s display to normal performance.
Key takeaways:
-
Start with the simplest fixes—restart, update, and test in Safe Mode
-
Use the screenshot test to quickly determine if your issue is software or hardware
-
For hardware issues, weigh the costs and risks of DIY repair vs. professional service
-
Consider your MacBook Pro’s age and value when deciding between repair and replacement
-
Invest in protective measures to prevent future display damage
Remember that iFixit offers comprehensive repair guides and quality replacement parts for most MacBook Pro models. Whether you choose to tackle the repair yourself or seek professional help, understanding the problem is the first step toward a solution.
Your MacBook Pro is a powerful tool—don’t let a screen problem keep you from getting the most out of it. With the right knowledge and approach, you can restore your display and get back to work in no time.
Related posts:
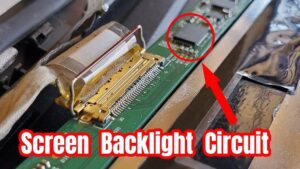
![Display Backlight Service Program ifixit]()
How to Check If Your Device Qualifies for the Display Backlight Service Program?
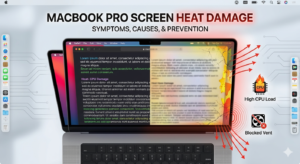
![MacBook Pro Screen Heat Damage ifixit.org.uk]()
What Is Everything You Need to Know About MacBook Pro Screen Heat Damage?
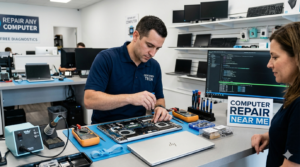
![How to Find Reliable Computer Repair]()
How to Find Reliable Computer Repair: A Comprehensive Guide to Troubleshooting and Professional Supp...
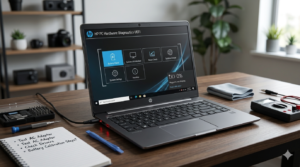
![How to Fix an HP Notebook Computer Battery That Is Not Charging]()
How to Fix an HP Notebook Computer Battery That Is Not Charging?
![How to Fix Overheating Issues on HP Omen and Victus Gaming Laptops]()
How to Fix Overheating Issues on HP Omen and Victus Gaming Laptops?
![How to Fix MacBook Pro Screen Burn Marks and Restore Display Quality?]()
How to Fix MacBook Pro Screen Burn Marks and Restore Display Quality?
![Microsoft Surface Laptop 3 Screen Crack: ifixit.org.uk]()
Microsoft Surface Laptop 3 Screen Crack: Comprehensive Guide to Causes, Repair Options, and Preventi...
![How to Fix a MacBook That Won't Turn On? A Complete Troubleshooting Guide]()
How to Fix a MacBook That Won't Turn On? A Complete Troubleshooting Guide