Introduction
Few things are as frustrating as glancing at your MacBook Pro screen and noticing a faint ghost image stubbornly lingering in the background. Maybe it’s the outline of your dock, a faded browser window, or shadowy menu bar icons that refuse to disappear. These are classic signs of MacBook Pro screen burn marks—a problem that can range from a minor annoyance to a serious display defect requiring professional intervention.
The good news? Not every screen mark means permanent damage. Many cases of MacBook Pro screen burn marks are actually temporary image retention that can be reversed with simple adjustments. However, distinguishing between temporary ghosting and permanent burn-in is crucial—because the solutions are entirely different.
In this guide, we’ll walk you through everything you need to know: what causes MacBook Pro screen burn marks, how to diagnose the problem accurately, step-by-step fixes you can try at home, and when it’s time to seek professional screen replacement. By the end, you’ll have a clear action plan to restore your display quality and prevent future issues.
Understanding MacBook Pro Screen Burn Marks: What Are They Really?
When people talk about MacBook Pro screen burn marks, they’re often describing several different types of display abnormalities. It’s important to understand what you’re actually dealing with before attempting any fixes.
Image Retention vs. Permanent Burn-In
Image retention (also called ghosting or image persistence) is a temporary phenomenon where a faint afterimage of a previously displayed static element remains visible on the screen. This happens when liquid crystals in the display panel temporarily lose their elasticity and struggle to return to their neutral position. The good news: image retention typically fades over time, especially when the screen displays moving content or is turned off for a while.
Permanent burn-in, on the other hand, involves actual physical degradation of the display pixels. The pixel material permanently loses brightness or color accuracy, and the ghost image becomes a permanent fixture. Once burn-in occurs, the only solution is screen replacement.
Common Types of Screen Marks
MacBook Pro screen burn marks can manifest in several ways:
-
Ghost images: Faint outlines of menu bars, docks, browser tabs, or desktop icons that linger after switching screens
-
Yellow or brownish patches: Discoloration often caused by heat stress or aging display components
-
Blueish spots: Particularly noted on certain MacBook Pro models, often attributed to static background images
-
Shadow patches or cloudy areas: Uneven brightness or dark spots that may indicate pressure damage or LCD issues
-
Black stripes or lines: Often a sign of a failing T-CON board or display connection
What Causes MacBook Pro Screen Burn Marks?
Understanding the root cause of MacBook Pro screen burn marks is essential for choosing the right fix. Here are the most common culprits:
1. Prolonged Display of Static Images
This is the leading cause of image retention. Leaving the same content on your screen for extended periods—whether it’s a desktop wallpaper, a dock, a menu bar, or an open application—stresses the liquid crystals in the display. Over time, these crystals can lose their ability to return to their neutral state quickly, resulting in ghosting.
2. High Brightness Settings
Running your MacBook Pro at maximum brightness continuously accelerates display wear and increases the risk of retention. Brightness generates heat, and heat aggravates the stress on liquid crystals.
3. Heat Exposure and Poor Ventilation
Internal heat is a silent enemy of display health. Heat-sensitive components like the T-CON board (which drives the LCD panel) can degrade when the system isn’t cooling effectively. Dust buildup inside the laptop, heavy gaming without proper fan management, and using the MacBook on soft surfaces that block ventilation all contribute to heat-related display damage.
4. Pressure Damage
Physical pressure on the display—from closing the lid with debris between the keyboard and screen, carrying the laptop in an overcrowded bag, or accidentally sitting on it—can cause permanent pressure marks.
5. Aging Display Panels
Like any technology, display panels degrade over time. Older Retina MacBook models are generally more prone to image retention compared to newer displays.
6. Screen Coating Wear
The anti-reflective coating on MacBook Pro screens can wear off over time, creating stained or cloudy areas that some users mistake for burn marks.
How to Diagnose MacBook Pro Screen Burn Marks: Software or Hardware?
Before you panic or book an expensive repair, it’s essential to determine whether your MacBook Pro screen burn marks are caused by a software-related issue or a hardware defect. Here’s a systematic approach:
Test 1: Restart Your MacBook Pro
A simple restart can clear temporary graphics glitches or display behavior issues. If the mark stays in the exact same place after reboot, the problem is more likely tied to the physical screen itself.
Test 2: Check on a Plain White or Gray Background
Open a full-screen white or light gray image (you can create a blank document in Preview or use a solid-color wallpaper). MacBook Pro screen burn marks—whether yellow spots, gray shadows, or burn-like patches—stand out more clearly on uniform backgrounds. If the mark stays in one fixed area, it points toward display panel damage, coating wear, or pressure damage.
Test 3: Take a Screenshot and Compare
This is one of the most reliable tests. Take a screenshot of your screen (Shift + Command + 3) and view it on another device or send it to an external monitor. If the mark doesn’t appear in the screenshot but remains visible on your MacBook Pro screen, the issue is with the physical display—not with the image rendered by macOS.
Test 4: Connect to an External Monitor
Connect your MacBook Pro to an external monitor or TV and compare both displays. If the external monitor looks normal while the MacBook Pro screen still shows burn marks, yellow patches, or shadow spots, the internal display is the likely fault. If both screens show the same issue, the problem may be related to graphics handling or system-wide display behavior.
Test 5: Reset NVRAM/PRAM
Resetting the NVRAM (non-volatile random-access memory) or PRAM (parameter RAM) can sometimes resolve display-related issues. To do this:
-
Shut down your Mac
-
Turn it on and immediately press and hold Option + Command + P + R
-
Hold for about 20 seconds, then release
How to Fix MacBook Pro Screen Burn Marks: Step-by-Step Solutions
Once you’ve diagnosed the problem, it’s time to take action. Here are proven methods to address MacBook Pro screen burn marks, starting with the simplest and least invasive options.
1. Enable a Screensaver
A screensaver keeps pixels active and reduces prolonged static exposure. Here’s how to set one up:
-
Open System Settings
-
Go to Screen Saver
-
Select an animated screensaver
-
Set a short idle activation time (e.g., 5 minutes)
2. Reduce Display Brightness
Lowering brightness reduces heat buildup and extends display lifespan:
-
Open Apple Menu → System Settings → Displays
-
Reduce the brightness slider to a comfortable but not maximum level
3. Enable Dark Mode
Dark Mode reduces screen contrast and decreases stress caused by bright static elements:
-
Open System Settings → Appearance
-
Select Dark Mode
4. Auto-Hide the Dock and Menu Bar
The Dock and Menu Bar are static UI elements that remain on-screen for long periods. To auto-hide them:
-
Right-click on the Dock → select Dock Settings → enable Automatically hide and show the Dock
-
Go to System Settings → Control Center → enable Automatically hide and show the menu bar
5. Change Your Desktop Wallpaper
Static background images are a common cause of MacBook Pro screen burn marks. Switch to a solid color background, ideally a mid-gray, which reduces stress on the display crystals.
6. Use Pixel-Exercising Software
There are programs designed to “exercise” the liquid crystals within the display panel. While extreme damage won’t be corrected, minor damage often improves with these tools. Some users have reported success with applications that cycle colors across the screen to help crystals regain their elasticity.
7. Allow the Screen to Rest
If the ghost image appeared recently, simply turning off the display or letting the screensaver run for a period approximately as long as the image was displayed can help clear it.
8. Update macOS
Sometimes display bugs are resolved in software updates. Ensure your Mac is running the latest version of macOS:
-
Open System Settings → General → Software Update
-
Install any available updates
When to Seek Professional Help: Screen Replacement Options
If you’ve tried all the software fixes and your MacBook Pro screen burn marks persist, it’s time to consider professional repair. Here’s what you need to know:
Signs You Need a Screen Replacement
-
The ghost image remains visible even after the screen has been off for several hours
-
The marks are visible on a plain white background and don’t change with different content
-
You’ve confirmed the issue is hardware-related using the diagnostic tests above
-
The display shows black stripes, flickering, or complete failure
Repair Options
1. Apple Authorized Service
Apple’s official repair pricing tends to range from $455 to $755 for Retina-display MacBook Pros, with newer M4 models potentially costing closer to $900 or more out-of-warranty. While expensive, this option guarantees genuine parts and professional installation.
2. Third-Party Repair Shops
Services like iFixit offer repair guides and genuine replacement parts for those who prefer to handle repairs themselves. iFixit specializes in screen replacements and stocks most Apple LCD screens. For MacBook Pro models, the display assembly is often the only repair option, as the cover glass is welded onto the LCD and the screen as a whole to the frame.
3. DIY Screen Replacement
iFixit provides detailed, step-by-step repair guides for specific MacBook Pro models. However, this is not recommended for beginners—especially for Touch Bar models, where the job is particularly complex. Repair kits can cost nearly €400, and you’ll need patience and steady hands.
Cost Estimates (2026)
| Model | Estimated Screen Replacement Cost |
|---|---|
| MacBook Pro 13″ (Intel) | From $299 |
| MacBook Pro 13″ (M1) | From $349 |
| MacBook Pro 14″ | From $549 |
| MacBook Pro 16″ | From $649 |
| MacBook Pro Retina (Apple official) | $455 – $755 |
| MacBook Pro M4 (Apple official) | Up to $900+ |
Prevention: How to Avoid MacBook Pro Screen Burn Marks
Prevention is always better than cure. Here are expert tips to keep your display in top condition:
1. Use Display Sleep
Set your display to sleep after a short period of inactivity. Apple recommends setting display sleep after 15 minutes of non-use. To adjust:
-
Open System Settings → Battery → Options
-
Set Turn display off after to a short duration
2. Rotate Your Wallpaper
Use a dynamic wallpaper or rotate through multiple images to prevent any single static image from being displayed for too long.
3. Avoid Maximum Brightness
Keep brightness at a comfortable level rather than maximum. This reduces heat and extends display lifespan.
4. Keep Your MacBook Cool
Ensure proper ventilation:
-
Use your MacBook on hard, flat surfaces
-
Clean dust buildup from fans and heatsinks periodically
-
Consider using a monitoring app like TG Pro to manage fan speeds during intensive tasks
5. Close the Lid When Not in Use
Don’t leave your MacBook Pro open with a static image on the screen for extended periods when you’re not actively using it.
6. Use a Screen Protector Carefully
While screen protectors can help prevent scratches, be aware that some can trap heat or cause pressure points. Choose high-quality protectors designed for your specific model.
Real-World Scenarios: When Burn Marks Appear
Scenario 1: The Developer’s Nightmare
A software developer leaves their MacBook Pro on all day with the same IDE open, dock visible, and menu bar static. After a few months, they notice faint outlines of the dock and menu bar even when watching videos. This is classic image retention. Solution: Enable auto-hide for the dock and menu bar, use a screensaver, and reduce brightness.
Scenario 2: The Student’s Dilemma
A student keeps their MacBook Pro open on their desk, displaying the same lecture notes for hours. They start noticing a ghost image of the document outline. Solution: Use a dynamic screensaver, set display sleep to 5 minutes, and change wallpapers regularly.
Scenario 3: The Gamer’s Problem
A gamer plays graphically intensive games for hours on end, with the MacBook running hot. Eventually, black stripes appear on the screen. This is likely heat damage to the T-CON board. Solution: Monitor internal temperatures, ensure proper cooling, and if the issue persists, professional screen replacement is needed.
Benefits vs. Drawbacks of Different Fixes
| Fix | Benefits | Drawbacks |
|---|---|---|
| Screensaver | Free, easy, prevents future retention | Doesn’t fix existing damage |
| Reduce Brightness | Free, extends display life, reduces heat | May affect visibility in bright environments |
| Dark Mode | Free, reduces eye strain, lowers contrast stress | Personal preference; not everyone likes dark mode |
| Auto-Hide UI Elements | Free, prevents static element retention | May take getting used to |
| Pixel-Exercising Software | Can improve minor damage | May not work for severe cases |
| Professional Screen Replacement | Permanent fix, genuine parts | Expensive, time-consuming |
| DIY Replacement | Cheaper than professional service | Risky, voids warranty, complex |
Expert Tips for MacBook Pro Display Care
“The liquid crystals in the panel sandwich can lose their elasticity returning back to their neutral position. Brightness and heat tend to aggravate this when you have a static image which stresses the crystals.” — iFixit Repair Expert
Tip 1: If you notice MacBook Pro screen burn marks early, act quickly. Temporary image retention is much easier to reverse than permanent burn-in.
Tip 2: Use the screenshot test regularly. If the mark doesn’t appear in screenshots, you’re dealing with a hardware issue—not a software glitch.
Tip 3: For older MacBook Pro models (particularly 2012–2017 Retina models), image retention is more common. Be extra vigilant with display care.
Tip 4: If you’re considering DIY repair, check iFixit’s website for your specific model’s repair guide and parts availability.
Tip 5: Don’t ignore heat issues. Dust buildup and poor ventilation can lead to T-CON board failure, which requires a full display assembly replacement.
Frequently Asked Questions
Q1: Can MacBook Pro screen burn marks be fixed without replacing the screen?
A: Yes, if the issue is temporary image retention rather than permanent burn-in. Try the software fixes outlined above—screensaver, reduced brightness, dark mode, auto-hide UI elements, and pixel-exercising software. If these don’t work after a few days, the damage may be permanent.
Q2: Are MacBook Pro screens prone to burn-in?
A: MacBook Pro displays use LCD (or Mini-LED) technology, which is less prone to permanent burn-in than OLED panels. However, image retention (temporary ghosting) can still occur. The Touch Bar on some models uses OLED and can experience burn-in.
Q3: How long does it take for image retention to disappear?
A: It varies. Minor ghosting may fade within minutes to hours. More persistent retention might take a day or two of varied content display. If it doesn’t improve within a week, it’s likely permanent.
Q4: Will Apple replace my screen for free?
A: Apple has offered free repair programs for certain MacBook Pro models with known display issues (e.g., 2016–2017 models with backlight problems). However, these programs have specific eligibility criteria and time limits. Check Apple’s official support website for current programs.
Q5: Is it worth repairing an older MacBook Pro with screen burn marks?
A: Consider the cost of repair versus the value of your MacBook. For a 10-year-old model, a $500+ screen replacement may not be cost-effective. You might consider using the MacBook with an external monitor as a desktop alternative.
Conclusion
MacBook Pro screen burn marks can be alarming, but they don’t always spell disaster. The key is accurate diagnosis: distinguish between temporary image retention and permanent hardware damage using the simple tests we’ve outlined. For temporary issues, software adjustments like screensavers, reduced brightness, dark mode, and auto-hiding static UI elements can often resolve the problem.
If the marks persist and you’ve confirmed it’s a hardware issue, professional screen replacement is the only permanent solution. While costly, it restores your display to like-new condition. For those on a budget, using your MacBook with an external monitor can be a practical workaround.
Actionable Takeaways:
-
Diagnose first – Use the screenshot and external monitor tests to determine if the issue is software or hardware.
-
Try software fixes – Enable screensavers, reduce brightness, use dark mode, and auto-hide the dock and menu bar.
-
Prevent future issues – Set display sleep to 15 minutes, avoid maximum brightness, and keep your MacBook cool.
-
Know when to seek help – If software fixes don’t work after a week, consult a professional.
-
Consider your options – Weigh the cost of repair against the value of your device before committing to a screen replacement.
Related posts:
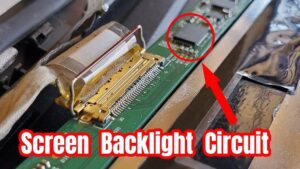
![Display Backlight Service Program ifixit]()
How to Check If Your Device Qualifies for the Display Backlight Service Program?
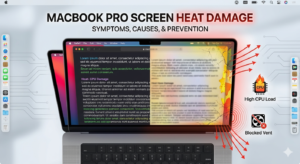
![MacBook Pro Screen Heat Damage ifixit.org.uk]()
What Is Everything You Need to Know About MacBook Pro Screen Heat Damage?
![How to Find Reliable Computer Repair]()
How to Find Reliable Computer Repair: A Comprehensive Guide to Troubleshooting and Professional Supp...
![How to Fix an HP Notebook Computer Battery That Is Not Charging]()
How to Fix an HP Notebook Computer Battery That Is Not Charging?
![How to Fix Overheating Issues on HP Omen and Victus Gaming Laptops]()
How to Fix Overheating Issues on HP Omen and Victus Gaming Laptops?
![How to Fix Screen Problems on a MacBook Pro]()
How to Fix Screen Problems on a MacBook Pro and Restore Normal Display Performance
![Microsoft Surface Laptop 3 Screen Crack: ifixit.org.uk]()
Microsoft Surface Laptop 3 Screen Crack: Comprehensive Guide to Causes, Repair Options, and Preventi...
![How to Fix a MacBook That Won't Turn On? A Complete Troubleshooting Guide]()
How to Fix a MacBook That Won't Turn On? A Complete Troubleshooting Guide