Upgrading to a brand-new iPhone is always an exciting milestone. Whether you are unboxing the latest flagship model or transitioning to a reliable replacement, the very first challenge you will face is moving your digital life from your old device to your new one. Your photos, text messages, application data, settings, and personal preferences define your user experience, making a seamless data migration absolutely essential.
When looking into how to transfer iphone to iphone, you will find that Apple has developed several robust, native pathways to make this shift as painless as possible. However, choosing the wrong method or failing to prepare your hardware can lead to stalled progress bars, missing files, or data corruption.
This comprehensive, highly detailed guide breaks down every official and alternative technique to help you understand exactly how to transfer iphone to iphone without losing a single byte of data. From native wireless transfers to physical desktop configurations, we cover the exact steps, compare the pros and cons of each method, provide real-world scenarios, and offer troubleshooting tips for a flawless upgrade.
1. The Pre-Transfer Checklist: Preparing Your Hardware
Before diving into the migration workflows, you must prepare both devices. Skipping these foundational steps is the leading cause of failed data transfers.
-
Check iOS Compatibility: Your new iPhone must run the same version of iOS or later than your old iPhone. If your old phone is on a newer beta or software update, update the new iPhone first during its initial setup assistant phase.
-
Charge Both Devices: Data migration consumes significant processing power and battery life. Plug both phones into a reliable power source or ensure they are charged to at least 80%.
-
Verify Apple ID Credentials: Know your Apple ID username and password. You will need to input these to authorize data security and initiate iCloud syncing.
-
Check Wi-Fi and Bluetooth Status: Native local transfers rely heavily on point-to-point wireless connections. Ensure Bluetooth is enabled on the old device, and verify that your local Wi-Fi connection is stable. For a quick operational check on your network stability, you can review the steps on connecting to WiFi on iPhone to verify everything is configured correctly.
-
Unpair Your Apple Watch: If you own an Apple Watch, unpair it from your old iPhone before beginning. This automatically creates a fresh backup of the watch data onto your old phone, allowing it to migrate seamlessly to the new device.
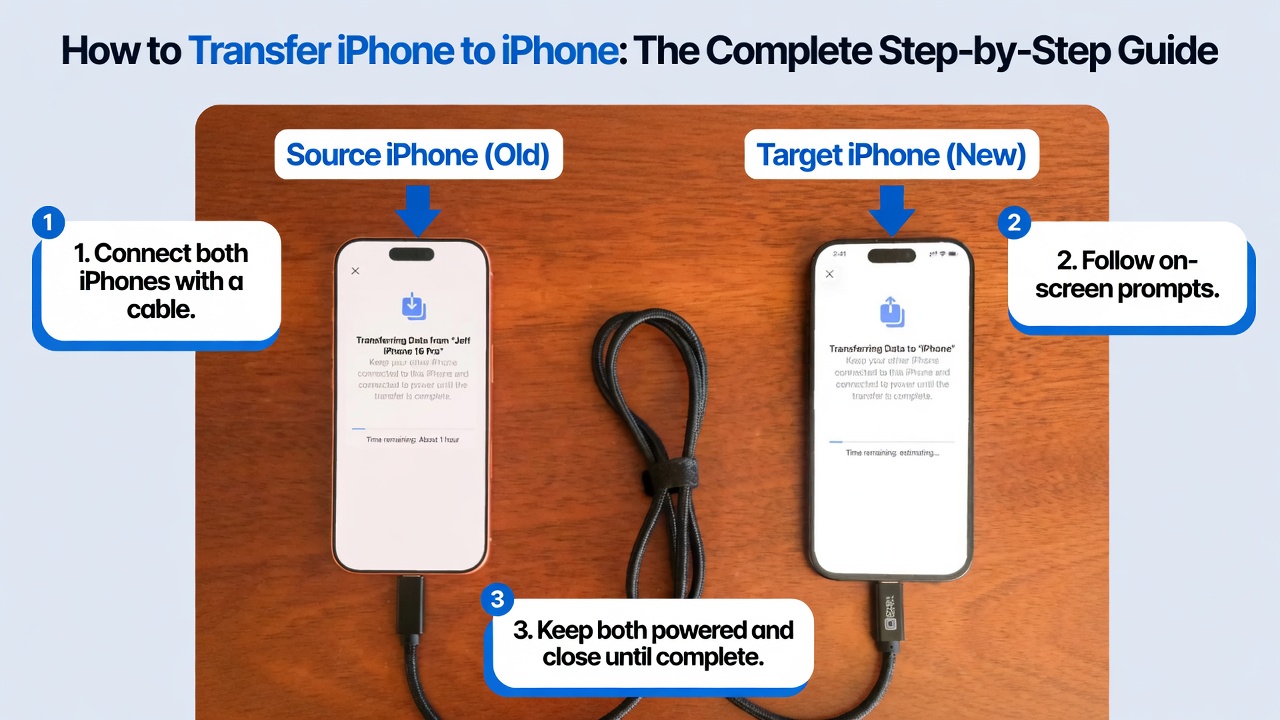
2. Method 1: Using Quick Start (The Best Wireless Option)
Apple’s Quick Start is the most popular, intuitive, and modern method available when figuring out how to transfer iphone to iphone. It establishes a direct, secure local wireless link (or wired connection via an adapter) between the two devices to clone your old phone onto the new one.
Step-by-Step Quick Start Procedure
Real-World Scenario: Upgrading in a Coffee Shop
Imagine you just picked up a new phone and want to set it up immediately while away from home. By utilizing the local wireless option within the Quick Start protocol, your devices establish an ad-hoc local network. This allows you to understand how to transfer iphone to iphone without relying on a slow public Wi-Fi network to download hundreds of gigabytes of cloud storage data.
3. Method 2: Transferring via iCloud Backup (The Cloud-Based Route)
If you prefer to have a permanent cloud archive or if you are selling your old phone before your new one arrives, utilizing an iCloud backup is an exceptional choice. This approach allows you to restore all your applications, system configurations, and settings from any location with a strong internet connection.
How to Execute an iCloud Transfer
-
Force a Fresh Backup: On your old iPhone, navigate to Settings > [Your Name] > iCloud > iCloud Backup and select Back Up Now. Ensure the backup completes successfully.
-
Initialize the New Device: Power on the new phone and proceed through the initial setup pages until you reach the Apps & Data screen.
-
Choose the Cloud Restore Option: Tap Restore from iCloud Backup on the configuration interface.
-
Log In: Sign in with your Apple ID and password, select the most recent backup you created from the timestamped list, and keep the device connected to Wi-Fi.
Expert Tip: If you do not have enough paid cloud storage space, Apple provides temporary, free unlimited iCloud storage specifically for migrating to a new device. Go to Settings > General > Transfer or Reset iPhone and tap Get Started under the temporary storage banner to claim this benefit.
4. Method 3: Utilizing iTunes or Finder (The Wired Desktop Solution)
For users handling massive media libraries, high-resolution video files, or congested local wireless environments, a traditional wired desktop connection via a computer remains the fastest and most secure approach for how to transfer iphone to iphone.
Step-by-Step Desktop Guide
-
Connect Your Old iPhone: Use a lightning or USB-C cable to connect your old phone to your Mac (using Finder) or Windows PC (using iTunes).
-
Create an Encrypted Backup: Select your device in the software interface. Under the backups section, check the box for “Encrypt local backup” (this is critical because it forces the backup to include your saved passwords, health data, and Wi-Fi credentials). Click Back Up Now.
-
Connect the New iPhone: Once completed, unplug the old device, turn on the new iPhone, and connect it to the computer at the Apps & Data screen.
-
Restore the Image: Select Restore from Mac/PC Backup, pick your encrypted archive, enter the backup password, and let the high-speed wired connection transfer your files.
5. Comparative Analysis: Choosing the Right Method
Every data migration approach has distinct structural advantages and drawbacks. Selecting the ideal path depends heavily on your local hardware availability, network quality, and technical comfort level.
6. Real-World Troubleshooting: Managing Stuck Transfers and Setup Cancellations
Even with seamless software updates, things can occasionally go wrong during data migration. Understanding how to handle a frozen interface or execute a systematic cancellation is critical.
Managing the Cancellation and Reset Process
If your wireless connection drops out or the progress bar freezes for more than an hour, you will need to cancel the current attempt and restart.
-
Forcing a Cancellation: To interrupt a frozen transfer, physically separate the devices or hard reboot the new iPhone.
-
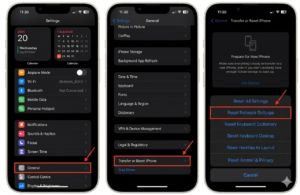
The Wipe and Reset Workflow: Once interrupted, the new iPhone will often sit in a partially configured, corrupt state. You must reset it completely to start clean. Navigate to Settings > General > Transfer or Reset iPhone, then select Erase All Content and Settings. Once the phone wipes itself and reboots to the flashing “Hello” screen, you can safely re-attempt the Quick Start process.
Common Hardware and Model Verification Pitfalls
When setting up your hardware profile or managing resale procedures for your older device, knowing exactly which generation of phone you are handling prevents configuration mismatches. If you ever find yourself uncertain about your exact phone specifications prior to migration, check out these instructions on how to identify your iPhone model to confirm your specific hardware generation. Furthermore, if you are planning to offload your previous phone immediately after completing the data migration, reviewing strategies on how to sell your iPhone 12 Pro can maximize your resale value on secondary consumer marketplaces.
7. Advanced Technical Nuances: What Happens Behind the Scenes?
When learning how to transfer iphone to iphone, it helps to understand the underlying architecture of iOS. Apple doesn’t actually clone the entire internal storage drive block-by-block. Instead, it generates a precise configuration manifesto detailing your account structures, preference sheets, file locations, and application keys.
During a Quick Start or iCloud restoration, the core operating system files remain untouched on the target hardware. The device downloads raw application packages directly from the App Store servers while populating those apps with the transferred user data directories. This explains why your device may feel warm or show placeholder icons for several hours after the main setup screens disappear; the background processor is actively unpacking app resources, re-indexing search metadata, and re-establishing system integrity.
8. Post-Transfer Optimization and Security Practices
Completing the progress bar does not mean your setup journey is completely over. To make sure your device operates safely and performs efficiently, execute these vital post-migration checks:
-
Verify Two-Factor Authentication Tokens: Security applications (like Google Authenticator or Microsoft Authenticator) do not move their secret encryption keys across devices via standard iCloud backups for security reasons. Open these apps manually on your new phone to re-link your accounts before clearing your old device.
-
Re-authorize Bank Cards in Apple Wallet: Credit and debit cards migrate over for convenience, but their security tokens must be re-verified. Open the Wallet app, tap on each card, enter your CVV security codes, and complete the banking SMS or email verification steps.
-
Manage Background Activity and Diagnostics: If your new device experiences battery drain or runs slowly during its first 48 hours, this is typically due to massive asset syncing. You can monitor system load trends and look up general diagnostic optimization workflows by exploring the tips found in this desktop performance and diagnostic guide.
-
Safe Shutdown Procedures: If you ever need to turn off either phone during troubleshooting phases when a hardware button is stuck or unresponsive, you can refer to alternative operational tricks such as turning off your iPhone without the screen to safely reboot the hardware.
Conclusion: Mastering Your New Apple Ecosystem Setup
Successfully understanding how to transfer iphone to iphone boils down to solid preparation, choosing the right method for your physical environment, and exercising patience during the final file indexing states. For the vast majority of consumers, the wireless Quick Start protocol offers an unparalleled balance of convenience, automated configuration, and speed. However, if you are dealing with extensive storage volumes or low-bandwidth environments, traditional wired transfers via Finder or iTunes remain an invaluable fallback asset.
Key Takeaways for a Flawless Transition
-
Always keep both phones connected to a dedicated power brick throughout the entire migration cycle to prevent sudden shutdown failures.
-
Utilize Apple’s free temporary iCloud storage offering if your local physical space or paid cloud tier is too restricted to manage a comprehensive backup.
-
Double-check your authentication apps, banking cards, and Bluetooth pairings before completely erasing your old hardware.
-
If a transfer freezes, confidently employ the hard reset and data erasure process to return the phone to factory status and begin a clean installation.
By approaching your upgrade methodically, you preserve your digital history, protect sensitive passwords, and unlock the peak performance of your new smartphone investment from day one.
External References and Authoritative Resources
To learn more about advanced system administration, configuration setups, and specialized diagnostic practices within broader technological systems, check out these trusted external reference materials:
-
Review architectural deployment notes on the official documentation pages at Google.
-
Explore deep encyclopedic deep-dives on consumer electronics evolutionary timelines over at Wikipedia.
-
Analyze financial technology shifts and consumer market trends on Forbes.
-
Browse official system accessories, hardware peripherals, and consumer tools on Amazon.
-
Engage with global community troubleshooting forums and real-world user setup discussions on [suspicious link removed].
-
For advanced simulation environments, sim racing setups, or multi-display calibration parameters across external hardware, look closely at professional configurations using a [suspicious link removed].
Related posts:
![Apple iPhone 17e Unlocked by RedPocket Mobile]()
Apple iPhone 17e Unlocked by RedPocket Mobile: Best Budget Deal in 2026?
![How to Reset Network Settings on iPhone: Ifixit]()
How to Reset Network Settings on iPhone: The Complete 2025 Troubleshooting Guide
![How Can You Find a Reliable Phone Repair Service Near You]()
How Can You Find a Reliable Phone Repair Service Near You?
![How to Fix Android Phone Not Charging Properly ifixit.org.uk]()
How to Fix Android Phone Not Charging Properly: 2026 Troubleshooting Guide
![How to Fix iPhone Stuck on Apple Logo Screen?]()
How to Fix iPhone Stuck on Apple Logo Screen?
![Can You Fix a Broken Screen Without Replacing the Entire Device?]()
How Can You Fix a Broken Screen Without Replacing the Entire Device?
![ifixit.org.uk]()
How to Fix Horizontal Lines on Android Phone: Ultimate Troubleshooting and Repair Guide
![how to unhide apps on iphone]()
How to Unhide Apps on iPhone: A Complete, Step-by-Step Guide