Boost Your PC’s Speed Without the Headaches – What You Need to Know
Picture this: your PC is suddenly sluggish. Web pages take forever to load, multitasking feels like a chore, and everything just seems slower than it used to be. Upgrading your memory is one of the most effective fixes. Installing or replacing RAM in your desktop or laptop can dramatically improve speed and responsiveness – often at a fraction of the cost of buying a new machine.
I’ve watched countless YouTube tutorials, read forums, and tested the process on several systems. Trust me, it’s easier than you think. But a few small missteps can turn a quick upgrade into a frustrating failure.
In this guide, I’ll walk you through exactly how do you install or replace RAM in a PC, highlight the five most common mistakes that limit performance, and give you actionable tips to avoid them. Whether you’re a DIY beginner or a seasoned builder, you’ll learn how to unlock your PC’s full potential with a smooth, successful upgrade.
What Does RAM Do and Why Should You Upgrade It?
Before we get into the nuts and bolts, let’s quickly understand why RAM matters. Random Access Memory (RAM) serves as your computer’s short-term memory. It stores data that your system needs to access instantly – like open applications, browser tabs, and game assets. When you run out of available RAM, your PC starts using your storage drive as makeshift memory, which is dramatically slower. This leads to lag, freezing, and sluggish performance.
Upgrading RAM provides several key benefits:
-
Faster Performance: More RAM reduces lag and improves system responsiveness.
-
Smoother Multitasking: Run multiple programs, browser tabs, or virtual machines without slowdowns.
-
Better Gaming: Modern AAA titles demand more memory for stable frame rates.
-
Extended Lifespan: A memory upgrade can delay the need for a full system replacement.
Choosing the Right RAM: Getting It Right Before You Start
🧠 Step 1: Know Your System
Installing or replacing RAM begins before you open your computer case. First, find out what memory your system supports:
-
On Windows, press
Ctrl+Shift+Escto open Task Manager → Performance tab → Memory. You’ll see the current RAM size, speed, and number of slots used. -
On macOS, click the Apple menu → About This Mac → Memory.
-
On Linux, open Terminal and type
free -horcat /proc/meminfo.
🔌 Step 2: Check Compatibility
Not all RAM is created equal. Your motherboard supports only a specific generation, form factor, and maximum speed:
-
DDR Generation – Modern systems use DDR4 or DDR5. These are not interchangeable. An 8GB DDR3 stick cannot be replaced with a 16GB DDR4 module.
-
Form Factor – Desktop PCs use larger DIMM modules; laptops use compact SO‑DIMMs.
-
Speed (MHz / MT/s) – Faster RAM can improve performance, but it will downclock to match the slowest stick in your system or your motherboard’s limit.
-
Capacity Limits – Check your motherboard manual or manufacturer website for the maximum supported RAM (e.g., 32GB, 64GB, or 128GB).
Pro Tip: Use free online compatibility tools from Crucial or Kingston. They automatically detect your system’s specs and recommend guaranteed‑to‑work upgrades.
Tools You’ll Need for a Smooth Upgrade
Before you begin, gather these essentials:
| Tool / Item | Purpose |
|---|---|
| Phillips‑head screwdriver (PH00 or PH0) | Opening the PC case or laptop cover |
| Anti‑static wrist strap or metal surface | Preventing electrostatic discharge (ESD) damage |
| New, compatible RAM modules | The upgrade itself |
| Clean, well‑lit workspace | Avoiding lost screws or accidental damage |
| Your motherboard or laptop manual | Locating correct slots and opening procedures |
Don’t skip the anti‑static strap. Static electricity from your body can carry up to 25,000 volts – enough to fry sensitive components. A simple $5 wrist strap or regularly touching an unpainted metal part of your computer case will safely ground you.
Step‑by‑Step Guide to Installing or Replacing RAM
1. Prepare Your Workstation
-
Shut down your computer completely (not just sleep or hibernate).
-
Unplug all cables, including the power cord.
-
For laptops, remove the battery if it’s removable.
-
Press and hold the power button for 5–10 seconds to discharge any residual electricity.
2. Ground Yourself
-
Wear an anti‑static wrist strap connected to a grounded metal surface, or
-
Touch an unpainted metal part of your computer chassis every few minutes.
3. Open the Case
-
Desktop: Remove the side panel (usually two thumbscrews at the back).
-
Laptop: Remove the bottom panel screws, then gently pry off the cover with a plastic spudger.
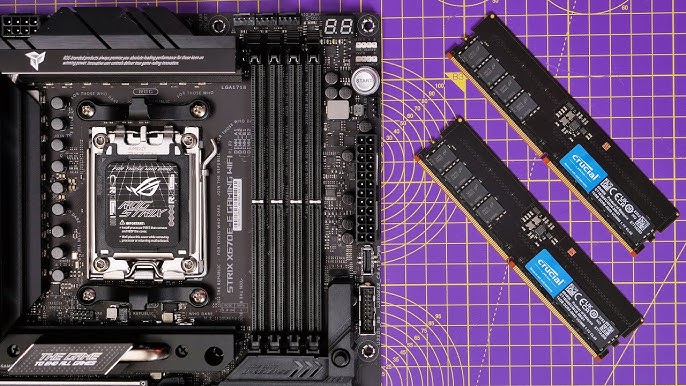
4. Locate the RAM Slots
-
Find the long, horizontal slots on the motherboard. They have small clips at each end.
-
On most modern boards, slots are colour‑coded or labelled A1, A2, B1, B2.
5. Remove Old RAM (If Replacing)
-
Push down on the clips at both ends of the module. The RAM will pop up at an angle.
-
Gently slide it out of the slot.
6. Install the New RAM
-
Align the notch on the bottom edge of the RAM stick with the key in the slot – it only fits one way.
-
Desktop: Hold the module at a 90‑degree angle and push straight down firmly until both side clips snap into place.
-
Laptop: Slide the module into the slot at a 30–45‑degree angle, then press it down flat until the clips click.
-
You should hear a distinct “click” – that’s the clips locking the RAM securely.
7. Close Up and Power On
-
Replace the side panel or bottom cover.
-
Reconnect all cables.
-
Turn on your computer. If it boots normally, you’re all set!
The 5 Common Mistakes to Avoid for Better Performance
Even with the right steps, many people sabotage their own upgrades. Here are the top five mistakes to avoid – and how they hurt performance.
❌ Mistake #1: Forgetting to Ground Yourself
The Problem: Electrostatic discharge (ESD) can instantly destroy RAM chips. Even a small static shock that you don’t feel can cause “latent” damage that leads to system instability or premature failure months later.
The Fix: Always wear an anti‑static wrist strap or keep one hand on a bare metal part of the computer case while handling components. Work on a hard surface, avoid carpet, and remove plastic bags from your workspace.
Pro Tip: Before touching any component, touch an unpainted metal part of the case for ten seconds. This discharges any built‑up static electricity.
❌ Mistake #2: Installing RAM in the Wrong Slots (Killing Dual‑Channel)
The Problem: Many people install two RAM sticks in slots 1 & 2 or 3 & 4 instead of the correct configuration. This forces the system into single‑channel mode, cutting effective memory bandwidth by roughly half. Your PC will still work, but you’ll leave a significant amount of performance on the table.
Why It Matters: Dual‑channel memory doubles the bandwidth between the CPU and RAM. For gaming, video editing, and multitasking, this can translate into smoother frame rates, faster application loading, and better responsiveness. In CPU‑intensive games, the performance drop from single‑channel mode can exceed 20%.
The Fix: For a four‑slot motherboard, install your two RAM sticks in slots A2 and B2 (usually the second and fourth slots from the CPU). These are the primary slots that enable dual‑channel operation. Check your motherboard manual for the exact configuration – some boards use A1/B1 instead.
| # of Sticks | Correct Slot Configuration |
|---|---|
| 1 | A2 (second slot from CPU) |
| 2 | A2 + B2 (slots 2 and 4) |
| 4 | All slots filled |
Pro Tip: If you’re using a laptop, you have only two slots – fill both for dual‑channel mode. Some ultra‑portables have soldered RAM, so check before buying.
❌ Mistake #3: Not Applying Sufficient Force When Seating the RAM
The Problem: New RAM modules require more force than most beginners expect. Many people push gently, feel resistance, and assume the stick is fully inserted when it isn’t. A partially seated module can cause boot failures, random crashes, or the system not recognising all the installed memory.
The Fix: You need to apply 20–30 pounds of pressure – enough to visibly compress the gold “fingers” into the slot. When fully seated, the side clips will snap closed automatically, and only about 1/16th of an inch of the gold pins should remain visible (roughly the width of a pencil line drawn on paper).
Warning: Never force the RAM if it feels stuck. Double‑check that the notch is aligned correctly. Forcing misaligned RAM can break the slot or the module.
❌ Mistake #4: Mixing RAM With Different Speeds, Brands, or Timings
The Problem: When you mix RAM from different manufacturers or with different speeds, the system forces all modules to run at the speed of the slowest stick. Worse, mismatched timings and voltage requirements can cause system instability, blue screens, and even boot failures.
Example: You have an existing 8GB DDR4‑3200 CL16 stick and you add a new 16GB DDR4‑2666 CL18 stick. The system will run both at 2666MHz with CL18 timings. You paid for faster RAM but can’t use its speed.
The Fix: Always buy a matching kit of two or four identical modules. Manufacturers test these kits together to ensure perfect compatibility. If you’re adding to existing RAM, try to find an identical module – same brand, same model number, same speed, same CAS latency. In the real world, however, it’s often safer to replace the old kit entirely with a fresh matched pair.
Real‑World Scenario: Sarah had 8GB of RAM (1x8GB) and bought another 8GB stick from a different brand. After installing it, her system booted but crashed every time she opened a game. The two sticks had slightly different timings that her motherboard couldn’t reconcile. She returned the single stick, bought a matched 16GB kit (2x8GB), and the crashes disappeared.
❌ Mistake #5: Skipping BIOS / XMP (or EXPO) Configuration
The Problem: New high‑speed RAM (e.g., DDR5‑6000 or DDR4‑3600) defaults to a slower JEDEC standard speed (often 2133MHz or 2666MHz) when first installed. If you don’t enable XMP (Intel) or EXPO (AMD) in the BIOS, your expensive fast RAM will run at basic speeds – defeating the whole purpose of the upgrade.
The Fix: After installing the RAM and booting into Windows for the first time, restart the computer and enter the BIOS/UEFI (usually by pressing Delete, F2, or F12 during startup). Look for a setting called:
-
XMP (Intel)
-
EXPO (AMD)
-
DOCP (older AMD)
-
EOCP (some motherboards)
Enable the profile that matches your RAM’s rated speed. Save and exit. The system may take 30–60 seconds to “train” the new memory – this is normal. Don’t interrupt it.
Pro Tip: Even if you skip XMP, verify that the system sees your full memory capacity. Go to Task Manager → Performance → Memory. If Windows recognises all your RAM, you’re at least in a usable state.
🆚 DDR4 vs. DDR5: Which Generation Should You Choose?
If you’re building a new PC or upgrading a modern system, you’ll likely face the DDR4 vs. DDR5 decision. Here’s what the latest benchmarks reveal.
Performance Comparison
Recent tests show a clear trend: modern games increasingly benefit from higher memory bandwidth. In a head‑to‑head comparison, a system running DDR5‑6000 CL30 delivered dramatically better gaming performance than the same system with DDR4‑3600 CL14. Over a 12‑game average, DDR5 provided a 20% performance uplift. In some titles, the difference was even larger:
-
Marvel Rivals: 142 FPS with DDR5 vs. 107 FPS with DDR4 – a 33% drop when using DDR4.
-
Spider‑Man 2: Nearly 30% less fluidity with DDR4.
-
Cyberpunk 2077 with Ray Tracing: Framerates jumped from 66 to 88 FPS when switching to DDR5.
Which One Should You Buy?
| Choose DDR5 if… | Choose DDR4 if… |
|---|---|
| You’re building a new mid‑range or high‑end PC | You’re on a strict budget |
| You play modern AAA games (2023–2026) | Your motherboard only supports DDR4 |
| You do video editing, 3D rendering, or AI work | You already own a good DDR4 kit |
| You want your build to remain relevant for 3–5 years | You’re upgrading an older system |
Bottom line: For a new build in 2025–2026, DDR5 is the smarter investment. The performance gains are real, and prices have come down significantly. However, if your current motherboard only supports DDR4, don’t replace the whole platform just for memory – DDR4 is still perfectly capable for most everyday tasks.
🔧 Troubleshooting After Installation
Sometimes, things don’t go as planned. Here’s a quick checklist if your PC won’t boot or behaves strangely:
-
Reseat the RAM – Power down, unplug, and press firmly on both ends until the clips click. A surprisingly high number of issues are simply loose modules.
-
Test one stick at a time – If you installed two modules, try booting with just one in the primary slot (usually A2). If it works, swap to the other stick. This identifies a faulty module.
-
Clear CMOS – Remove the coin‑cell battery on the motherboard for 30 seconds (with power disconnected). This resets BIOS settings and can resolve XMP‑related boot failures.
-
Update the BIOS – An outdated BIOS may not support newer RAM modules. Download the latest version from your motherboard manufacturer’s website.
-
Listen for beep codes – Repeated beeps (e.g., three short beeps) usually indicate a memory error. Consult your motherboard manual for the exact code.
Remember: Motherboards often perform “memory training” the first time new RAM is installed. The PC may sit at a black screen for 30 seconds to two minutes – this is normal. Don’t force‑shut it down prematurely.
Quick Reference Checklist for Installing or Replacing RAM
| Step | Action | Check |
|---|---|---|
| 1 | Identify your current RAM and maximum supported capacity | ☐ |
| 2 | Buy a matched kit from the motherboard’s QVL or a trusted brand | ☐ |
| 3 | Shut down, unplug, and discharge residual power | ☐ |
| 4 | Ground yourself with an anti‑static strap | ☐ |
| 5 | Open the case and locate the RAM slots | ☐ |
| 6 | Remove old modules (if replacing) | ☐ |
| 7 | Install new modules in the correct dual‑channel slots (A2+B2) | ☐ |
| 8 | Apply firm, even pressure until clips snap | ☐ |
| 9 | Reassemble, power on, and enter BIOS to enable XMP/EXPO | ☐ |
| 10 | Verify the full memory capacity in Windows | ☐ |
External Resources for Further Reading
-
Intel’s Official Guide: How to Choose RAM for a Gaming PC – comprehensive advice on compatibility and capacity.
-
Crucial’s Memory Installation Guide: Is My RAM Compatible With My Motherboard? – includes a free system scanner.
-
TechSpot Benchmark Review: DDR5 vs. DDR4 Gaming Performance Revisited – detailed performance data with real‑world game tests.
Conclusion: Unlock Your PC’s Hidden Potential
Upgrading your system’s memory is one of the most cost‑effective ways to breathe new life into an older machine or supercharge a new build. Installing or replacing RAM might feel intimidating at first, but with the right preparation and attention to detail, it’s a straightforward process that almost anyone can complete in under thirty minutes.
Here are the key takeaways to remember:
-
Plan before you buy – Check your motherboard’s specifications, supported DDR generation, form factor, and speed limits.
-
Avoid the five common mistakes – Ground yourself, use the correct slots, seat modules firmly, stick with matched kits, and enable XMP/EXPO.
-
Don’t leave performance on the table – Proper installation can double your memory bandwidth (thanks to dual‑channel mode) and unlock the full speed of your new modules.
-
Troubleshoot calmly – If your system doesn’t boot on the first try, reseat the RAM, test one module at a time, or clear the CMOS. Most issues have simple fixes.
Whether you’re a gamer chasing higher frame rates, a creative professional handling large files, or just someone tired of their PC crawling under a few browser tabs, a RAM upgrade delivers immediate, tangible results. Take your time, follow the steps outlined in this guide, and enjoy a faster, more responsive computer for years to come.