Few things are as frustrating as being tethered to a wall outlet with a laptop that once promised all-day freedom. When your battery drains faster than ever or your machine suddenly shuts down at 30%, the solution might be simpler than you think. Learning how to replace a laptop battery safely at home is not only cost‑effective but also a great way to extend the life of a machine you otherwise love.
This guide will walk you through every stage of the process. We’ll cover how to tell if your battery actually needs replacing, the tools you’ll need, a clear step‑by‑step procedure for both external and internal batteries, how to buy the right replacement, and what to do afterward. By the time you finish, you will feel confident enough to handle a laptop battery replacement on your own.
📌 Why You Should Consider a DIY Battery Replacement
Before we dive into the steps, it’s worth understanding why doing this yourself makes sense. Many people rush to expensive repair shops or spend hundreds of dollars on manufacturer‑serviced battery swaps. In reality, a standard laptop battery replacement takes 15 to 30 minutes for most models, uses basic tools, and costs significantly less when you supply the part yourself.
Benefits of a DIY replacement include:
-
Saving money – you only pay for the battery, not labor.
-
Gaining hands‑on knowledge about your computer.
-
Avoiding long wait times at repair centers.
-
Keeping an old but perfectly functional laptop alive for years longer.
Of course, there is a drawback. Removing an internal battery requires opening the chassis, which can void a warranty if your computer is still covered. If you are unsure or uncomfortable working with electronics, professional help is always a backup plan.
🚨 When Should You Replace Your Laptop Battery?
Not every performance issue comes from a dying battery, but certain clear signs point directly to it. Before learning how to replace a laptop battery safely at home, check whether a replacement is truly necessary.
📉 Short Runtime and Fast Draining
If your laptop used to last five hours on a full charge but now barely makes it through a single meeting (two hours or less), the battery is likely in its final phase. Most modern lithium‑ion batteries are designed to hold roughly 80% of their original capacity after 500 to 1,000 charge cycles. Once the capacity drops below that threshold, a battery replacement will restore your laptop’s mobility.
⚡ Unexpected Shutdowns
Perhaps the most dangerous sign is when your laptop shuts down completely while still showing 30% or even 50% battery remaining. This happens because the battery’s internal circuitry can no longer deliver stable voltage. Unexpected shutdowns not only disrupt your work but can also corrupt open files and damage other components over time.
🧪 Swelling or Physical Deformation
This is a serious safety warning. If the bottom of your laptop feels uneven, the touchpad becomes hard to click, or you notice bulging anywhere on the chassis, stop using the laptop immediately. A swollen battery is a sign of internal gas buildup and can burst, catch fire, or leak hazardous chemicals. Do not charge it, do not press on it, and do not try to use it again. Arrange for an immediate battery replacement, and handle the old battery with extreme caution.
🔥 Overheating and Charging Issues
A failing battery often runs hot, even when the laptop is idle. You might also notice that the battery refuses to charge past a certain percentage (for example, stuck at 60%) or that Windows displays a “Consider replacing your battery” warning. Microsoft systems typically generate this alert when the full‑charge capacity falls below 40% of the design capacity.
💻 How to Check Battery Health
Before you commit to any hardware changes, check the battery’s official health reading. On Windows, open a command prompt and type powercfg /batteryreport, then look for the HTML file saved on your drive. On macOS, hold the Option key and click the battery icon to see “Condition: Normal / Replace Soon / Replace Now / Service Battery.”
🛡️ Essential Safety Preparations
Lithium‑ion batteries are convenient, but they demand respect. Follow these safety steps before you touch any internal component.
☑️ General Safety Checklist
-
Shut down completely – Do not put the laptop in Sleep mode. A full shutdown cuts power to almost all circuits.
-
Unplug everything – Remove the AC adapter, USB devices, external monitors, and any other cables.
-
Discharge the old battery to ≤25% – A near‑empty battery is less energetic if accidentally punctured. Leave the laptop unplugged and use it normally until the charge drops below one‑quarter.
-
Work in a clean, dry area – Avoid carpets that generate static electricity. A wooden or glass table is ideal.
-
Ground yourself – Static electricity can destroy delicate motherboard components. Touch an unpainted metal surface (like a door hinge or the metal of a plugged‑in appliance) every few minutes. For extra safety, use an anti‑static wrist strap.
-
Do not use metal tools to pry – If a battery is glued or stuck, apply a few drops of isopropyl alcohol (99%) along the edge with a syringe, then lift gently with a plastic spudger.
🧰 Tools You May Need
Most battery replacements require only a few small items:
-
A small Phillips (#0 or #00) screwdriver.
-
A plastic opening tool or an old guitar pick (to avoid scratching the case).
-
An anti‑static wrist strap (optional but recommended).
-
A clean, soft towel to protect the screen.
-
A small bowl or magnetic mat to hold screws.
❌ When NOT to Do It Yourself
If the battery is visibly swollen, do not attempt a DIY replacement unless you have experience with hazardous materials. Contact the laptop manufacturer, a certified repair center, or a battery recycling program for guidance. Swollen batteries can rupture if mishandled.
🧠 Step‑by‑Step: How Do I Replace a Laptop Battery Safely at Home?
The exact process depends on whether your laptop has an external (removable) battery or an internal (sealed) battery. Almost all laptops made before 2015 have external batteries; most modern ultrabooks have internal ones.
Type A: External (Removable) Battery Replacement
If your laptop has a physical latch on the bottom and the battery slides out without tools, follow these simple steps:
-
Turn the laptop over and locate the battery release latches. They are usually spring‑loaded.
-
Slide both latches outward (or inward, depending on the design) while pulling the battery away from the chassis.
-
Lift the battery free and set it aside in a safe, non‑conductive location.
-
Insert the new battery by aligning the metal contacts and pressing until the latches click into place.
-
Plug in the AC adapter and power on the laptop to verify that the new battery is detected.
That is it. For external batteries, no screwdrivers or opening of the case is required.
Type B: Internal (Sealed) Battery Replacement
Most modern laptops use an internal battery that is screwed into the motherboard and connected with a small ribbon cable. This process requires careful handling but is still manageable for a beginner.
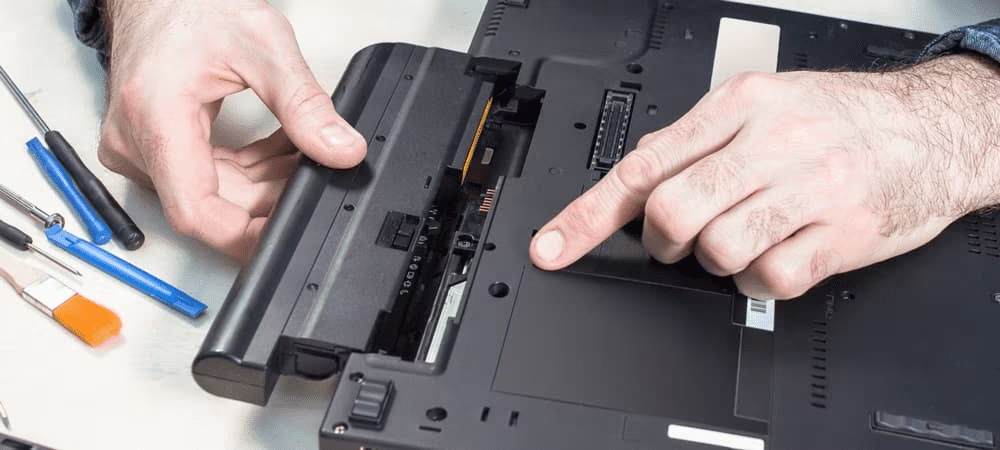
🔧 Step 1 – Remove the Bottom Cover
-
Place the laptop upside down on a soft towel.
-
Remove all visible screws on the bottom panel. Some screws may be hidden under rubber feet or stickers – gently peel those back.
-
Insert a plastic opening tool into the seam between the bottom cover and the chassis, then carefully work your way around the perimeter to unclip the cover.
🔌 Step 2 – Locate and Disconnect the Battery
-
Once the cover is off, look for a large flat component that occupies roughly one‑third of the interior space. That is your battery.
-
Find the battery cable where it connects to the motherboard. The connector is usually a small white or black plug with wires going into it.
-
Lift the connector straight up using a plastic tool or your fingernail. Never pull on the wires themselves.
🔩 Step 3 – Remove the Old Battery
-
Unscrew the screws holding the battery in place. Some batteries are also glued lightly; if so, use the isopropyl alcohol method mentioned above.
-
Lift the old battery out carefully and place it on a non‑conductive surface.
🔄 Step 4 – Install the New Battery
-
Position the new battery so that all screw holes align with the chassis.
-
Tighten the screws (do not overtighten – just snug).
-
Reconnect the battery cable by pressing the connector firmly until it clicks or seats flush.
🧩 Step 5 – Reassemble and Test
-
Snap the bottom cover back into place and reinstall all screws.
-
Flip the laptop over, plug in the charger, and start the computer.
-
Windows or macOS should detect the new battery immediately. If not, go to Device Manager, expand the “Batteries” category, uninstall any old ACPI drivers, then restart.
🧾 Choosing the Right Replacement Battery
Not all laptop batteries are created equal. When you search for a replacement, you will encounter two main categories: OEM (Original Equipment Manufacturer) and third‑party (aftermarket) .
✅ OEM Batteries
These are made by the same company that built your laptop (e.g., Dell, HP, Lenovo, Apple). They offer guaranteed compatibility, proper safety certifications, and usually the longest lifespan. The downside is price – OEM batteries can cost twice as much as generic options.
⚠️ Third‑Party Batteries
Third‑party batteries are cheaper and widely available on Amazon, eBay, and specialty battery sites. However, quality varies dramatically. Low‑quality cells may have lower capacity than advertised, fail after a few months, or – in the worst case – pose a fire risk because they lack overcharge and short‑circuit protection circuits.
Expert tip: If you go with a third‑party battery, look for UL 2054 or UL 1642 certification marks. These indicate the battery has passed independent safety tests for fire and electrical hazards. Also, read recent user reviews carefully.
🔢 How to Find the Correct Part Number
-
Remove the old battery (if possible) and read its model number printed on the label.
-
Search the laptop’s service manual using its full model number (e.g., “Dell Latitude 5520 service manual”).
-
Enter the laptop’s serial number on the manufacturer’s support website to see a list of compatible parts.
⚙️ After Replacement: Calibration and First Use
A fresh battery will work immediately, but its internal gauge may be slightly inaccurate. To ensure the battery percentage is reported correctly, perform a simple calibration.
How to Calibrate a New Laptop Battery
-
Charge the battery to 100% while the laptop is turned on. Keep it on the charger for at least two hours after reaching “100%” to allow a full top‑off.
-
Disconnect the charger and use the laptop normally until it automatically shuts down from low battery.
-
Let the laptop sit turned off for five hours (or overnight) to ensure all residual charge is gone.
-
Plug the charger back in and charge uninterrupted to 100% again.
This full discharge/recharge cycle teaches the battery’s management chip the true capacity. Many modern laptops also have built‑in calibration tools in the BIOS. Reboot and look for an option labeled “Battery Calibration” or “Start Battery Gauge Reset.”
First‑Week Best Practices
-
For the first week, avoid keeping the laptop permanently plugged in. Let the battery discharge to around 20–30% occasionally.
-
Do not store the laptop in hot places (e.g., inside a car in summer). Heat degrades lithium‑ion cells faster than anything else.
-
Install the manufacturer’s battery management utility (e.g., Lenovo Vantage, Dell Power Manager) to set charge thresholds (e.g., stop charging at 80%) if you mostly use the laptop plugged in. This dramatically extends battery life.
⚙️ Common Problems and Quick Fixes
Even a careful installation can occasionally hit a snag. Here are the most frequent issues after a battery replacement and how to resolve them.
🔌 Laptop does not recognize the new battery
-
Check the connector – Power down, open the laptop again, and reseat the battery cable. A slightly loose connection is the #1 cause.
-
Update BIOS – Visit the manufacturer’s website and install the latest BIOS (Basic Input/Output System) firmware. Some older BIOS versions lack support for newer battery firmware.
-
Clear static – With the battery disconnected and the charger unplugged, hold the power button for 30 seconds. This drains residual charge from capacitors.
-
Try the battery in another laptop (if you have a friend with the same model) to verify the battery itself is not defective.
🔋 Battery charges but drains extremely fast
-
This often means the battery needs calibration (see the calibration steps above).
-
If calibration does not help, the battery may be counterfeit or of low quality. Return it and try a different brand.
🖥️ Laptop only works when plugged in after replacement
-
Boot into the BIOS (usually by pressing F2, Del, or F10 during startup). If the BIOS does not detect the battery either, the connection is faulty or the battery is incompatible.
-
Some manufacturers (especially Dell and Lenovo) use “whitelisting” – the laptop will refuse to work with non‑authorized batteries. If this happens, your only solution is to buy an OEM battery.
🌱 How to Dispose of the Old Battery
Never throw a lithium‑ion battery into household trash or recycling bins. When crushed in a garbage truck, batteries can spark intense fires that injure workers and destroy equipment.
Safe Disposal Options
-
Store returns – Many electronics stores (Best Buy, Staples, Office Depot) accept old laptop batteries for free.
-
Manufacturer take‑back – Dell, HP, Apple, and Lenovo offer mail‑in recycling programs. Check their support pages for a free shipping label.
-
Municipal hazardous waste – Most cities have designated drop‑off days or permanent facilities for household hazardous waste.
-
Call2Recycle – This North American program lists hundreds of local drop‑off locations. Visit their website and enter your zip code.
Before disposal, tape over the metal contacts with non‑conductive electrical tape. This prevents accidental short‑circuits during transport.
🧭 Real‑World Scenario: Walking Through a Full Replacement
Let’s walk through a realistic example. Sarah owns a three‑year‑old HP Spectre x360. The battery now lasts only 90 minutes, and the bottom panel feels slightly warm to the touch. She runs a Windows battery report and sees 68% of original capacity. She decides to replace the battery herself.
-
Sarah buys a genuine HP battery (OEM) from the manufacturer’s website after verifying the part number in her laptop’s service manual.
-
She watches a 10‑minute iFixit video specific to her model.
-
After backing up her data and discharging the battery to 15%, she opens the bottom cover using a plastic pick.
-
She disconnects the battery cable, removes three screws, and lifts the old battery out.
-
The new battery slides into place. She screws it in, reconnects the cable, and snaps the cover shut.
-
After powering on, the laptop immediately shows 100% battery. Sarah calibrates it over the next two days.
-
She drops the old battery at a Best Buy recycling kiosk.
Total cost: $98 (OEM battery). Time invested: 25 minutes. Compare that to a repair shop charge of $199–$250.
📊 Internal vs. External Battery Replacement: A Quick Comparison
| Feature | External (Removable) Battery | Internal (Sealed) Battery |
|---|---|---|
| Tools required | None (just your hands) | Small Phillips screwdriver, plastic opener |
| Skill level | Beginner | Intermediate |
| Average time | 1–2 minutes | 15–30 minutes |
| Risk of damage | Very low | Moderate (if ribbon cables are torn) |
| Warranty impact | None | Usually voids warranty if opened |
| Cost of battery | $30–$60 | $50–$150 |
| Common in | Older laptops (pre‑2015) and budget models | Most modern ultrabooks and premium laptops |
🔗 External Resources & Trusted Sources
For more detailed information about lithium‑ion battery chemistry and safety, you can refer to the Wikipedia article on lithium‑ion batteries Lithium‑ion battery – Wikipedia.
If you need high‑quality replacement tools and detailed visual guides, the step‑by‑step repair library from iFixit is widely considered the gold standard for DIY electronics repair. A demonstration of the same mobile triple screen setup simracing attitude toward precision and reliability can help you treat your laptop with the same care.
Additionally, for reliable battery purchases, look for sellers on Amazon that are “Frustration‑Free” certified or recommended by the laptop manufacturer.
✅ Final Takeaways and Conclusion
Learning how to replace a laptop battery safely at home is a valuable skill that puts you back in control of your computer’s mobility. You save money, reduce electronic waste, and eliminate the frustration of being tied to a wall outlet.
Key points to remember:
✔️ Confirm the battery is the problem – use the built‑in battery report tools.
✔️ Always prioritize safety – discharge the battery, ground yourself, and never pry with metal tools.
✔️ Distinguish between external (easy) and internal (requires opening the case) batteries.
✔️ Choose a quality replacement battery – OEM is safest, but certified third‑party batteries are okay if money is tight.
✔️ Calibrate the new battery and follow first‑week best practices to maximize its lifespan.
✔️ Recycle the old battery properly – never in household trash.
If you have even basic manual dexterity, you can handle this repair yourself. However, if the battery is swollen or you feel overwhelmed, do not hesitate to contact a professional. Your safety always comes first.
Take the leap, replace that tired old battery, and enjoy a laptop that feels brand new again – without spending a fortune.
Related posts:
![Apple iPhone 17e Unlocked by RedPocket Mobile]()
Apple iPhone 17e Unlocked by RedPocket Mobile: Best Budget Deal in 2026?
![How to Reset Network Settings on iPhone: Ifixit]()
How to Reset Network Settings on iPhone: The Complete 2025 Troubleshooting Guide
![How Can You Find a Reliable Phone Repair Service Near You]()
How Can You Find a Reliable Phone Repair Service Near You?
![How to Fix Android Phone Not Charging Properly ifixit.org.uk]()
How to Fix Android Phone Not Charging Properly: 2026 Troubleshooting Guide
![How to Fix iPhone Stuck on Apple Logo Screen?]()
How to Fix iPhone Stuck on Apple Logo Screen?
![Can You Fix a Broken Screen Without Replacing the Entire Device?]()
How Can You Fix a Broken Screen Without Replacing the Entire Device?
![ifixit.org.uk]()
How to Fix Horizontal Lines on Android Phone: Ultimate Troubleshooting and Repair Guide
![how to unhide apps on iphone]()
How to Unhide Apps on iPhone: A Complete, Step-by-Step Guide