In today’s fast-paced world of technology, devices like smartphones, laptops, tablets, and gaming consoles have become integral to daily life. When these gadgets require repairs—whether replacing a battery, fixing a screen, or upgrading components—knowing the best practices for device reassembly can make the difference between a successful fix and costly damage.

Reassembly is often more challenging than disassembly because it demands precision, patience, and a systematic approach. This guide covers everything you need to know, from preparation to final testing, helping beginners and intermediate repair enthusiasts achieve professional results.
Why Proper Device Reassembly Matters
Rushing reassembly can lead to issues like loose connections, short circuits, or damaged components. Proper techniques ensure your device functions optimally, maintains structural integrity, and avoids voiding warranties where applicable.
Following the best practices for device reassembly not only saves money on professional repairs but also promotes sustainability by extending the lifespan of your electronics. Many users successfully repair their own devices after learning these fundamentals.
Essential Tools for Successful Reassembly
Having the right tools is foundational. Without them, even simple tasks become frustrating and error-prone.
- Precision Screwdriver Set: Includes various sizes like Phillips, Torx, and pentalobe for different devices.
- Magnetic Mat or Organizer: Keeps screws and small parts sorted and prevents loss.
- Tweezers and Spudgers: For handling delicate cables and prying without scratching surfaces.
- Isopropyl Alcohol (90%+): Cleans contacts and removes old adhesive.
- Anti-Static Wrist Strap: Protects sensitive electronics from static discharge.
- Magnifying Glass or Headlamp: Essential for seeing tiny components clearly.
- Adhesive Strips or Glue: For securing screens and batteries properly.
Investing in a quality kit from reputable sources can streamline your repairs significantly.
Step-by-Step Guide to Device Reassembly
The best practices for device reassembly emphasize working methodically in reverse order of disassembly.
1. Preparation and Workspace Setup
Clear a well-lit, static-free workspace. Lay out all parts systematically. Use containers or an ice cube tray for screws grouped by removal order. Take photos or videos during disassembly—these serve as your visual roadmap.
2. Inspect Components Thoroughly
Before reassembling:
- Check for damage, bent pins, or debris.
- Clean all contact points with isopropyl alcohol.
- Ensure ribbon cables are undamaged and flexible.
3. Reconnect Cables and Connectors Carefully
Align connectors precisely and press gently until they seat. Avoid forcing them, as this can bend pins or tear cables. Use tweezers for fine adjustments.
4. Secure Screws in the Correct Order and Torque
Start with internal screws and work outward. Do not overtighten—snug is usually sufficient. Refer to your photos to match screw lengths to their original positions. Different screws serve different purposes; using the wrong one can crack plastic or damage threads.
5. Apply Adhesives and Seals Properly
For phones and tablets, use manufacturer-recommended adhesive strips. Align the screen carefully and apply even pressure. Allow proper curing time before powering on.
Common Mistakes to Avoid in Device Reassembly
Even experienced repairers encounter pitfalls. Awareness helps you sidestep them:
- Mixing Up Screws: Leads to stripped holes or improper fit.
- Rushing the Process: Causes pinched cables or misaligned parts.
- Ignoring Static Electricity: Can fry sensitive chips instantly.
- Forgetting to Reconnect Components: Results in non-functional devices after reassembly.
- Overheating During Soldering (if applicable): Damages boards if temperatures aren’t controlled.
Real-world scenario: A user replacing a laptop battery forgot to reconnect the trackpad ribbon cable. The device powered on but had no input functionality—easily avoided with a checklist.
Safety Precautions for Electronics Reassembly
Safety is non-negotiable. Always power down and unplug devices. Discharge capacitors if working on power supplies. Wear protective eyewear and gloves when handling sharp edges or glass.
For battery-related repairs, avoid puncturing cells, as they can swell or leak. Work in a ventilated area when using adhesives or solvents.
Device-Specific Reassembly Tips
Smartphones and Tablets
These compact devices require extra patience due to adhesive and fragile displays. Focus on aligning cameras and sensors correctly. Test touch functionality before fully sealing the device.
Laptops and PCs
Laptops involve more layers. Reinstall cooling systems carefully to ensure proper thermal contact. Check that hinges and keyboards align smoothly.
Gaming Consoles and Other Electronics
Consoles often have proprietary screws. Document wireless antenna placements, as poor reconnection affects signal strength.
Expert Tips and Actionable Advice
- Work in a Team or Use Guides: For complex repairs, follow detailed tutorials from trusted communities.
- Test Incrementally: Power on the device at key stages to catch issues early.
- Organize by Layers: Reassemble from the innermost components outward.
- Backup Data: Always back up before any repair.
- Learn from Failures: Every mistake teaches something valuable for future projects.
Many enthusiasts recommend starting with simpler devices like older phones before tackling flagship models.
Benefits vs. Drawbacks of DIY Device Reassembly
Benefits:
- Significant cost savings.
- Greater control over repair quality.
- Educational and empowering.
- Environmental benefits through reduced e-waste.
Drawbacks:
- Risk of voiding warranties.
- Potential for further damage if inexperienced.
- Time investment.
- Need for specialized tools.
For many, the benefits outweigh the drawbacks when following best practices for device reassembly.
Advanced Techniques for Professional Results
Once comfortable with basics, explore techniques like using a hot plate for even adhesive application or precision soldering for board-level repairs. Track repair history for recurring issues in your devices.
Consider modular devices designed for easier repairs, as they simplify the reassembly process.
Tools and Resources for Ongoing Learning
Reliable resources enhance your skills. Check comprehensive repair manuals and community-driven guides.
For hands-on inspiration, explore forums where users share experiences with everything from basic fixes to advanced modifications.
External Resource: Discover detailed step-by-step instructions on iFixit, a leading platform for repair enthusiasts.
Another excellent reference for professional insights is available through technology publications like those on Forbes for broader repair trends.
Conclusion
Mastering the best practices for device reassembly equips you with valuable skills to maintain and repair your electronics confidently. From meticulous organization and proper tool use to careful reconnection and thorough testing, each step contributes to a reliable outcome.
Key takeaways include documenting every disassembly phase, using the right tools, working methodically, and prioritizing safety. Whether you’re fixing a smartphone screen or upgrading a laptop, these principles help minimize risks and maximize success.
Start small, practice consistently, and don’t hesitate to consult expert guides for specific models. By embracing DIY repair, you not only save money but also contribute to a more sustainable approach to technology consumption. Your devices will thank you with longer, more reliable service.
Take action today: Gather your tools, choose a simple repair project, and apply these best practices. With patience and attention to detail, you’ll soon handle reassembly like a pro.
Related posts:
![facebook video downloader facebook video downloader]()
How to Change Name on Facebook: The Complete 2026 Guide
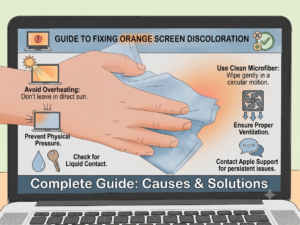
![Fix Orange Discoloration on MacBook Pro Screen]()
How to Fix Orange Discoloration on MacBook Pro Screen: Complete Guide to Causes & Solutions
![Google Gemini in 2026]()
What Is Everything You Need to Know About Google Gemini in 2026?
![fbi warns iphone android scams]()
Why the FBI Warns iPhone Android Scams Are Increasing
![What Should You Know About the iPhone 17 in 2026]()
What Should You Know About the iPhone 17 in 2026, Including Features, Specs, Price, Release Date, an...
![Best Free Password Managers ifixit]()
Best Free Password Managers: Secure Your Digital Life in 2026
![Snapchat Planets - ifixit]()
How Do Snapchat Planets Work and What Does Each Planet Mean in the Friend Solar System?
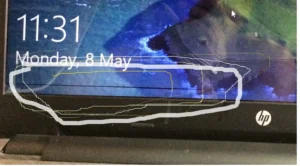
![What Causes Black Lines on Laptop Screen]()
What Causes Black Lines on Laptop Screen? A Complete Troubleshooting Guide