Sticky keys on a MacBook can be incredibly frustrating. Whether you’re typing an important email or editing a document, a key that sticks or feels sluggish disrupts your workflow and can lead to errors. The good news is that many cases of sticky keys can be resolved safely at home without risking damage to your expensive device.
This comprehensive guide covers everything from understanding the causes to step-by-step fixes, professional options, and long-term prevention. We’ll focus on methods that prioritize safety, drawing from Apple’s official recommendations and trusted repair practices.
Why Do MacBook Keyboard Keys Become Sticky?
Understanding the root cause helps you choose the right fix and avoid repeating the problem. Common culprits include:
- Dust, crumbs, and debris: Everyday particles accumulate under keys, especially in butterfly or scissor-switch mechanisms used in various MacBook models.
- Spills: Sugary drinks like coffee, soda, or juice leave residue that hardens over time.
- Skin oils and fingerprints: Natural oils from hands build up, creating a tacky feel.
- Humidity or environmental factors: High moisture can cause keys to swell or attract more dust.
- Manufacturing or wear issues: In older butterfly keyboards (pre-2020 models), even tiny specks could cause problems, though newer models are more resilient.
Real-world scenario: A student working in a cafe spills a small amount of latte on their MacBook Air. Initially, it seems fine, but days later, the spacebar and several letter keys start sticking. Early action prevents escalation.
Fixing Sticky Keyboard Keys on MacBook starts with gentle, non-invasive methods before progressing to deeper cleaning.
Step 1: Basic Non-Invasive Cleaning (Safest Starting Point)
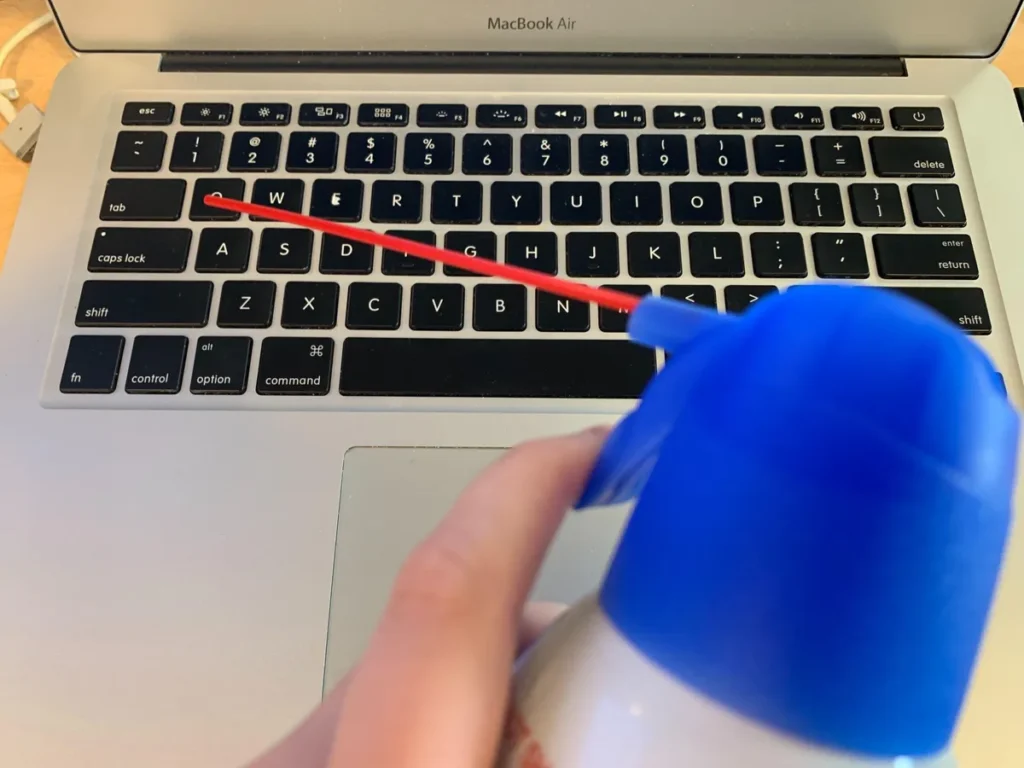
Apple provides clear guidelines for initial cleaning. Always power off and unplug your MacBook before starting.
- Position the MacBook correctly: Hold it at a 75-degree angle (not fully vertical) with the keyboard facing you.
- Use compressed air: Spray in a left-to-right motion across the keys. Use the included straw for precision and keep the can upright to avoid propellant liquid.
- Rotate and repeat: Turn to the right side, spray again, then the left side, and finally upside down.
This method dislodges loose debris effectively for many users.
Expert Tip: A quick “blow and press” technique—turning the laptop upside down, blowing hard with your mouth on the sticky key, and rapidly pressing it—has helped some with minor stickiness, as it uses airflow and mechanical action without tools.
Using Isopropyl Alcohol Safely for Stubborn Stickiness
For residue that compressed air can’t handle, 90%+ isopropyl alcohol is a go-to solution because it evaporates quickly and dissolves many sticky substances.
Materials needed:
- 90%+ isopropyl alcohol
- Cotton swabs (Q-tips)
- Soft microfiber cloth
- Toothpicks or plastic spudger (for gentle prying)
- Compressed air
Step-by-step process:
- Dampen (do not soak) a cotton swab with alcohol.
- Gently wipe around the base of the sticky key.
- For deeper access, carefully lift the keycap if your model allows (more on this below).
- Press the key repeatedly while cleaning to work the solution through the mechanism.
- Allow full drying time (at least 30-60 minutes) before powering on.
Warning: Use minimal liquid. Excess can seep into the logic board and cause serious damage. Test on a less critical area first.
When and How to Remove Keycaps (Advanced Cleaning)
Removing keycaps allows thorough cleaning but carries risks if done incorrectly. Newer MacBook models with scissor mechanisms make this easier than old butterfly designs.
Pros and Cons:
| Aspect | Benefits | Drawbacks |
|---|---|---|
| Effectiveness | Deep clean under keys | Risk of breaking clips |
| Difficulty | Good visibility of debris | Requires steady hands |
| Time | Targets specific keys | 30-60+ minutes for multiple keys |
| Safety | Precise if careful | Potential warranty void if damaged |
How to remove keys safely:
- Use a plastic spudger or guitar pick to gently pry from the bottom or side.
- Clean the keycap and underlying mechanism with alcohol-dampened swabs.
- Soak keycaps in mild soapy water if heavily soiled, then dry completely.
- Reinstall by aligning and pressing firmly until they click.
Beginner Advice: Watch detailed model-specific videos or consult a professional for M-series MacBooks. Not all keys (like the spacebar or large keys) remove the same way.
Professional Repair Options
If DIY methods fail or you’re uncomfortable proceeding, visit an Apple Store or Authorized Service Provider. They have specialized tools and can assess for internal liquid damage.
Many users report success after Genius Bar visits for spill-related stickiness. Costs vary—cleaning might be free under warranty, while key replacements can be pricier outside warranty.
External Resource: For more on Apple keyboard service, check Apple’s official support pages.
Consider third-party repair shops with good reviews for faster or more affordable options, but use authorized services for warranty-covered devices.
Comparing Cleaning Methods: Benefits vs Drawbacks
- Compressed Air Only: Safest, quickest for dust. Limited against sugary residue.
- Alcohol + Swabs: Effective against stickiness. Requires care with liquid.
- Keycap Removal: Most thorough. Highest risk for beginners.
- Professional Service: Reliable results. More expensive and time-consuming.
Choose based on severity. Minor dust? Start with air. Spill residue? Combine methods carefully.
Preventive Measures to Avoid Future Sticky Keys
Prevention is easier than cure. Incorporate these habits:
- Regular maintenance: Weekly compressed air sessions.
- Eating and drinking habits: Keep food and drinks away from your workspace.
- Keyboard covers: Thin silicone covers protect against spills (ensure good ventilation).
- Hand hygiene: Clean hands before typing reduce oil buildup.
- Environment control: Use in low-dust, moderate-humidity areas.
- Software checks: Sometimes “sticky keys” can be a macOS feature—go to System Settings > Accessibility > Keyboard to disable if accidentally enabled.
Real-World Example: A remote worker who frequently eats at their desk noticed recurring stickiness. Switching to a separate keyboard tray and cleaning weekly eliminated the issue.
Additional Tips for Different MacBook Models
MacBook Air and Pro models from different years vary slightly:
- 2016-2019 Butterfly Keyboards: More prone to dust issues; extra caution needed.
- 2020+ Scissor Switch: More durable but still benefit from regular care.
- M1/M2/M3/M4 Models: Similar cleaning applies, but key removal techniques may differ.
Always check your specific model on Apple’s site for tailored advice.
Tools and Products Worth Considering
- Compressed air cans (with straw).
- High-purity isopropyl alcohol.
- Anti-static brushes or soft toothbrushes.
- Microfiber cloths.
- Optional: Keyboard vacuum attachments.
Avoid household cleaners, bleach, or excessive water.
Trusted Source: Many users share experiences on communities like Reddit for model-specific troubleshooting.
Common Mistakes to Avoid
- Using excessive force when prying keys.
- Spraying liquid directly onto the keyboard.
- Turning compressed air cans upside down.
- Powering on before fully dry.
- Ignoring warranty implications.
Patience and gentleness yield the best results.
When to Replace the Keyboard Entirely
If keys remain unresponsive after cleaning, there may be deeper hardware damage. Apple or authorized repairs can replace the keyboard assembly. For older models, consider the cost versus a new device.
Conclusion
Fixing Sticky Keyboard Keys on MacBook doesn’t have to be stressful or damaging when approached methodically. Start with Apple’s compressed air technique, escalate to careful alcohol cleaning if needed, and seek professional help for persistent issues. By understanding causes, using the right tools, and adopting preventive habits, you can maintain a smooth, responsive keyboard for years.
Actionable Takeaways:
- Power off and use proper angles for cleaning.
- Prioritize safety over speed—dry thoroughly.
- Clean regularly to prevent buildup.
- Know your model’s specifics.
- Don’t hesitate to consult experts when in doubt.
Your MacBook is a significant investment. With these steps, you can resolve sticky keys effectively while protecting your device. If you’ve tried these methods, share your results in the comments—your experience might help another reader!
Related posts:
![facebook video downloader facebook video downloader]()
How to Change Name on Facebook: The Complete 2026 Guide
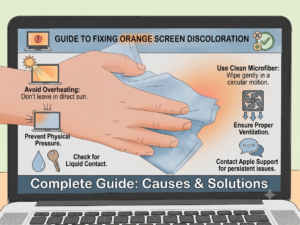
![Fix Orange Discoloration on MacBook Pro Screen]()
How to Fix Orange Discoloration on MacBook Pro Screen: Complete Guide to Causes & Solutions
![Google Gemini in 2026]()
What Is Everything You Need to Know About Google Gemini in 2026?
![fbi warns iphone android scams]()
Why the FBI Warns iPhone Android Scams Are Increasing
![What Should You Know About the iPhone 17 in 2026]()
What Should You Know About the iPhone 17 in 2026, Including Features, Specs, Price, Release Date, an...
![Best Free Password Managers ifixit]()
Best Free Password Managers: Secure Your Digital Life in 2026
![Snapchat Planets - ifixit]()
How Do Snapchat Planets Work and What Does Each Planet Mean in the Friend Solar System?
![What Causes Black Lines on Laptop Screen]()
What Causes Black Lines on Laptop Screen? A Complete Troubleshooting Guide