Why is My 13 Inch MacBook Pro Display Backlight Not Working? How to Identify and Fix the “Flexgate” Issue
Imagine opening your laptop to answer an urgent email, only to find the screen completely pitch black. You can hear the internal fans spinning, the keyboard illumination is glowing, and the notification chimes are pinging, but the actual display refuses to show anything. For thousands of Apple users, this exact scenario points directly to a failure within the 13 inch macbook pro display backlight hardware assembly.
Often referred to in the tech community as “Flexgate,” backlight failure is one of the most common hardware flaws affecting modern laptops. It turns a premium machine into an expensive desktop bound to an external monitor.
This comprehensive guide covers everything you need to know about diagnosing, understanding, and resolving issues with your screen backlight. We will look at why it happens, how much it costs to repair, and how you can get your machine running again.
Understanding the Technology Behind Your Laptop’s Screen Illumination
To understand why a display goes dark, it helps to know how a modern LCD works. The liquid crystal display panel itself does not produce light; it only filters light to create colors and images.
A dedicated array of Light Emitting Diodes (LEDs) located at the edge or bottom of the display assembly provides the necessary illumination. This light is evenly distributed across the panel through a series of optical diffusers and light guides.
When you adjust your screen brightness keys, you are directly controlling the voltage sent to this internal illumination grid. If the delicate circuitry or the physical cables carrying power to these LEDs get damaged, the display will lose its source of light. Even if the graphics card is rendering your operating system perfectly underneath, the screen will appear completely dark to the naked eye.
Primary Symptoms of a Failing 13 Inch MacBook Pro Display Backlight
Backlight failures rarely happen completely out of nowhere. In most cases, the hardware gives warning signs before stopping completely. Recognizing these symptoms early can help you back up your files and plan a repair.
1. The “Stage Light” or “Spotlight” Effect
This is the most famous visual indicator of an impending cable failure. You will notice distinct, alternating patches of brightness and darkness along the very bottom edge of your panel. It looks remarkably like the dramatic spotlighting seen on a theater stage. This happens when individual power traces inside the ribbon cable begin to crack, causing some LEDs to lose power while others stay lit.
2. Backlight Cuts Out Beyond a Certain Angle
Another classic sign of hardware wear is a screen that functions normally when opened slightly (around 40 to 60 degrees) but turns off completely when pushed past a 90-degree angle. This occurs because tilting the top case pulls the damaged internal ribbon cable taut, breaking the weak electrical connection.
3. Total Screen Blackout with Visible Content Under Flashlight
If your screen is completely black but the machine is otherwise responsive, try this simple test: Shine a bright flashlight or smartphone light directly at the glass from a close angle. If you can faintly see the outlines of your app windows, desktop icons, or the login screen, your graphics processor is working fine—the problem is a complete lack of power to the illumination panel.
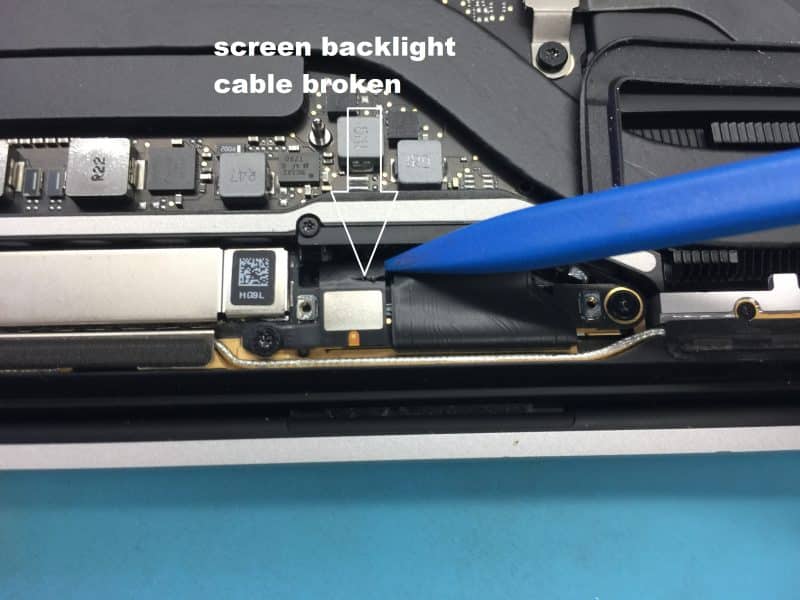
The Root Technical Cause: What is “Flexgate”?
The term “Flexgate” describes a mechanical design vulnerability introduced in modern laptop redesigns. To make the unibody frame as thin and lightweight as possible, traditional heavy-duty display cables were replaced with thin, flexible ribbon cables wrapped directly around the hinge controller board.
Every single time you open and close your laptop lid, these thin cables are pulled taut under tension. Over months or years of regular use, the repetitive mechanical strain causes the microscopic copper traces inside the ribbon cable to degrade, crack, and snap. Because the specific trace carrying power to the screen illumination grid is under the highest physical tension, it is almost always the first component to fail.
Model Year Vulnerability and Official Replacement Programs
Not every model experiences this hardware defect at the exact same rate. Apple recognized this specific engineering flaw in certain configurations and launched official service initiatives to address it.
The 2016 13-Inch Service Program
Apple officially launched the 13-inch MacBook Pro Display Backlight Service Program after widespread user feedback. This initiative specifically covers machines sold between October 2016 and February 2018. If your machine meets the qualification criteria, an authorized service provider will replace the entire top display housing free of charge for up to five years after the original retail purchase date.
Eligible models include:
-
MacBook Pro (13-inch, 2016, Four Thunderbolt 3 Ports)
-
MacBook Pro (13-inch, 2016, Two Thunderbolt 3 Ports)
What About 2017 to 2020 Models?
Though the 2017 through 2020 models use a highly similar mechanical design, they are not officially covered under the free extended service program. However, in late 2018, manufacturing lines quietly elongated the internal flexible backlight cable by roughly 2mm. This small adjustment provides just enough slack to reduce structural tension, drastically lowering the failure rate on newer variants.
If your 2017 or newer machine experiences a total blackout, you will likely have to pay out of pocket for a repair unless you have active AppleCare+ coverage.
Step-by-Step Diagnostic Guide for Users
Before spending money on replacement hardware, it is smart to run through a quick diagnostic routine to rule out temporary software bugs or NVRAM glitches.
Step 1: Perform an NVRAM/PRAM Reset (Intel Models Only)
-
Shut down your laptop completely.
-
Press the power button, then immediately press and hold Option + Command + P + R.
-
Keep holding these keys down for roughly 20 seconds.
-
Release the keys after you hear a second startup chime or see the Apple logo appear and disappear twice. Check if your display returns to normal.
Step 2: Reset the System Management Controller (SMC)
The SMC manages power distribution, including screen illumination. To reset it:
-
Power down your machine and connect the official USB-C charging cable to a wall outlet.
-
On the built-in keyboard, press and hold Shift + Control + Option on the left side, then press the Power Button at the same time.
-
Hold these keys down for 10 seconds, then release them all simultaneously.
-
Press the power button normally to turn your machine back on.
Step 3: Check External Video Output
Plug your laptop into an external desktop monitor or television using a compatible USB-C to HDMI adapter. If the external screen displays your operating system perfectly, you can confirm that your motherboard, CPU, and integrated graphics chips are working exactly as they should. This isolates the failure to your built-in screen hardware.
Evaluating Your Repair Options: DIY vs. Professional Service
When dealing with a broken 13 inch macbook pro display backlight, you have a few different routes to consider depending on your technical confidence, tool availability, and budget.
1. Official Authorized Replacement
If your machine is covered under an active service program or AppleCare+, this is your best option. An Apple technician will replace the entire aluminum top case assembly with direct factory parts. Out-of-warranty replacements at the Apple Store generally run between $500 and $700, as they replace the entire top panel rather than repairing the individual broken wire.
2. Independent Micro-Soldering Component Repair
Many independent repair shops offer component-level micro-soldering. Rather than throwing away an otherwise perfect LCD panel, a technician can delicately scrape away the coating on the broken flexible circuit board, micro-solder an extension bridge across the cracked trace, and reinforce the connection. This delicate process cuts repair bills down to roughly $150 to $250.
3. DIY Home Repair Guide
For tech-savvy individuals who want to tackle the fix at home, replacing the full top assembly is completely possible with patience and proper tools.
To ensure a smooth repair, it is critical to use specialized guides and high-quality replacement components. Check out these helpful resources for your repair project:
-
Detailed breakdown of replacement parts on iFixit UK Screen Parts
-
Step-by-step guidance for iFixit UK Display Assembly Guides
-
Sourcing quality tools from iFixit UK Repair Tools
-
Diagnostic support over at iFixit UK Troubleshooting
-
Finding the correct layout with iFixit UK Replacement Keyboards
Caution: Opening up modern aluminum unibody laptops requires specialized pentalobe screwdrivers, suction cups, and heavy-duty nylon spudgers. Mishandling internal lithium-ion battery cells poses a serious fire hazard.
Proactive Prevention: How to Protect Your Laptop Screen
While you cannot completely alter the physical layout of your laptop’s internal wiring, practicing a few simple habits can extend the lifespan of your flexible display components.
-
Avoid Over-Rotating Your Screen: Try not to push your display panel back to its maximum structural stop angle during everyday use. Keeping the lid tilted at a standard 90 to 105-degree angle reduces the pulling strain on internal wiring.
-
Open the Lid Smoothly from the Center: Avoid grabbing your screen by one of the top corners to pull it open. This twists the aluminum frame unevenly, applying uneven stress to the left and right hinge assemblies. Always lift smoothly from the center front notch.
-
Keep Hinge Tracks Clean: Small crumbs, pocket lint, or dirt can slide into the open ventilation gap near the clutch cover. This debris can get caught against the flexible printed circuit boards, scraping or tearing them when you close the screen. Keep your desk surface clean and regularly clear out the rear ventilation gaps with canned air.
If you are setting up an intensive home workstation, managing your peripheral placement properly can also reduce wear and tear. For example, if you configure a premium mobile triple screen setup simracing simulator on your desk, keeping your main laptop open at a modest, fixed angle while utilizing external displays is an excellent way to balance productivity while protecting your internal display assembly from unnecessary motion.
Frequently Asked Questions (FAQ)
Can a software update fix my display backlight?
No. While rare bugs can cause temporary screen glitches, a permanent “stage light” pattern or a screen that blanks out beyond a certain angle is a physical hardware issue. Software updates cannot repair cracked copper wiring inside a flexible circuit board.
Is it safe to continue using my laptop with an external monitor if the backlight fails?
Yes. Using your machine closed in “clamshell mode” connected to an external monitor, mouse, and keyboard is perfectly safe. It will not cause any extra damage to your internal logic board or processor.
How long does an independent micro-soldering repair take?
Most experienced independent service shops can complete a micro-soldering cable modification or a full screen housing swap within 1 to 3 business days, depending on their current repair queue and parts availability.
Summary of Key Takeaways
Dealing with a broken screen is frustrating, but knowing the cause makes it easier to handle. Let’s summarize the key points covered in this article:
-
Spot the Signs Early: Watch out for the “stage light” pattern along the bottom bezel or a display that shuts down past a specific viewing angle.
-
Isolate the Fault: Use a simple smartphone flashlight test and verify external video outputs to quickly confirm whether your backlight circuit has failed.
-
Verify Program Coverage: Check your purchase invoice and serial number details against Apple’s official 2016 recall guidelines before spending money out of pocket.
-
Choose Your Fix Wisely: Balance the premium cost of an official top-case replacement against affordable independent micro-soldering alternatives or a rewarding DIY fix using trusted parts.
By carefully evaluating your machine’s current symptoms and checking your service eligibility, you can pick the smartest pathway to restore your display brightness and get your workstation back up and running.
Related posts:
![How to fix Google Messages landscape layout issues on Android phone]()
How to Fix Google Messages Landscape Layout Issues on Android Phone?
![fix 403 forbidden error on Google Chrome ifixit.org.uk]()
How to Fix 403 Forbidden Error on Google Chrome: The Complete Troubleshooting Guide
![Microsoft Surface Laptop 3 Screen Crack: ifixit.org.uk]()
Microsoft Surface Laptop 3 Screen Crack: Comprehensive Guide to Causes, Repair Options, and Preventi...
![Why Won’t macOS Golden Gate 27 Beta Install in a Virtual Machine]()
Why Won’t macOS Golden Gate 27 Beta Install in a Virtual Machine?
![How to Fix Google Chrome Not Updating on Older Macs]()
How to Fix Google Chrome Not Updating on Older Macs (2026 Complete Guide)
![How to Screenshot on Mac: The Ultimate Guide to Keyboard Shortcuts & Hidden Features]()
The Ultimate Guide on How to Screenshot on Mac: Shortcuts, Tips, and Hidden Utilities
![How to Fix mds_stores High Memory and CPU Usage on Mac]()
How to Fix mds_stores High Memory and CPU Usage on Mac
![How to Install macOS Golden Gate 27 Beta on Your Mac]()
How to Install macOS Golden Gate 27 Beta on Your Mac?