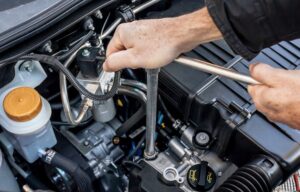
The good news is that understanding why your vehicle’s A/C is not blowing cold air is the first step toward an effective solution. While some repairs require professional expertise, many issues can be diagnosed—and sometimes even fixed—by the average car owner. This comprehensive guide will walk you through everything you need to know about a/c vehicle repair, from understanding how the system works to diagnosing common problems and deciding when to call a professional.
How Your Car’s Air Conditioning System Works
Before diving into repairs, it helps to understand the basic operation of your vehicle’s A/C system. Automotive air conditioning systems operate on a single-stage vapor compression refrigeration cycle. Rather than generating cold air, these systems absorb and remove heat from the cabin, transferring it outside the vehicle.
The system relies on four main components working in harmony:
| Component | Function |
|---|---|
| Compressor | Pressurizes refrigerant and circulates it through the system |
| Condenser | Releases heat from refrigerant into outside air |
| Expansion Valve/Orifice Tube | Restricts refrigerant flow, creating a pressure drop |
| Evaporator | Absorbs heat from cabin air, leaving cool air exiting the vents |
Refrigerant cycles continuously through these components, changing from gas to liquid and back again as it absorbs and releases heat. When any component fails or the refrigerant level drops, the system can no longer effectively cool the cabin.
Common Causes of a Car A/C Not Blowing Cold Air
There are several reasons why your car’s air conditioner might stop blowing cold air. Understanding these potential causes will help you diagnose the problem more effectively.
1. Low or Leaking Refrigerant
Low refrigerant levels are the most common reason a car’s AC fails to blow cold air. Refrigerant is the lifeblood of your A/C system—without enough of it, the system simply cannot produce cold air.
The system operates in a closed loop and does not consume refrigerant. If levels are low, there is almost certainly a leak somewhere in the system—in hoses, seals, the condenser, or the evaporator. Even a tiny leak can gradually reduce cooling performance over months.
Signs of low refrigerant include:
-
AC blows cool but not cold air
-
AC works intermittently
-
Visible oily residue around AC fittings or connections
-
Compressor clutch cycles on and off rapidly
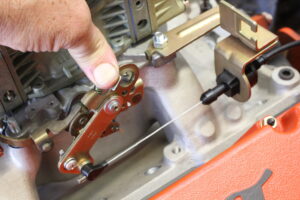
2. Failing AC Compressor
The compressor is often described as the heart of the air conditioning system. It pressurizes refrigerant and keeps it circulating. If the compressor fails or the clutch stops engaging, refrigerant cannot flow through the system.
Warning signs of compressor trouble:
-
Clicking or rattling noise when AC is turned on
-
Compressor clutch not spinning
-
AC blows warm air consistently
Compressor replacement is typically the most expensive a/c vehicle repair, often costing $1,000 to $2,500 depending on the vehicle.
3. Dirty or Blocked Condenser
The condenser sits at the front of your vehicle, usually just behind the grille. Its job is to release heat from the refrigerant into the outside air. Road debris, bugs, dirt, and leaves can block airflow through the condenser, reducing its ability to cool the refrigerant.
A clogged condenser is one of the simplest issues to fix—often requiring nothing more than a gentle cleaning with soap and water.
4. Clogged Cabin Air Filter
This is one of the most overlooked causes of poor AC performance. The cabin air filter prevents dirt, pollen, and debris from entering the cabin through the vents. When it becomes clogged, airflow is restricted, and cooling output drops dramatically.
Most manufacturers recommend replacing the cabin air filter every 12,000 to 15,000 miles. It’s an inexpensive fix that can make a noticeable difference.
5. Electrical Issues
Modern vehicles rely on a complex network of sensors and electrical components to regulate the AC system. A faulty relay, blown fuse, bad pressure switch, damaged wiring, or malfunctioning temperature sensor can all disrupt cooling.
Common electrical culprits include:
-
Blown AC fuse
-
Faulty compressor relay
-
Bad A/C pressure switch
-
Loose or corroded wiring connections
6. Broken Blend Door Actuator
The blend door actuator controls airflow between the heater core and the evaporator. If it becomes stuck on the heat setting, your AC will blow hot air regardless of the temperature setting.
Symptoms of a bad blend door actuator:
-
Clicking or ticking noise behind the dashboard
-
Inconsistent temperature control
-
Different temperatures on driver and passenger sides
7. Faulty Cooling Fans
If your AC only works when the vehicle is moving but blows warm air when idling, the cooling fans may be the problem. At idle, there is no natural airflow through the condenser, so the fans must draw air across it. If the fans aren’t working, the condenser can’t release heat effectively.
Step-by-Step Diagnostic Guide
Before attempting any a/c vehicle repair, follow this systematic diagnostic process. Guessing and replacing parts randomly gets expensive fast.
Step 1: Perform a Visual Inspection
Start with a comprehensive visual inspection of the AC system. Look for:
-
Oily residue on hoses, fittings, or components (indicates refrigerant leaks)
-
Visible damage to the condenser (from road debris)
-
Loose or disconnected wiring
-
Worn or cracked drive belts
-
Debris blocking the condenser
Step 2: Check the Cabin Air Filter
Locate the cabin air filter (usually behind the glove box or under the dashboard). If it’s dirty or clogged, replace it. This simple fix often restores cooling performance.
Step 3: Verify Compressor Operation
With the engine running and AC turned to maximum:
-
Open the hood and locate the AC compressor
-
Look at the front of the compressor—the clutch should be spinning
-
If the clutch isn’t engaging, there may be an electrical issue or low refrigerant
Step 4: Check Fuses and Relays
Consult your owner’s manual to locate the AC fuse and relay. Use a multimeter to test for continuity. Replace any blown fuses.
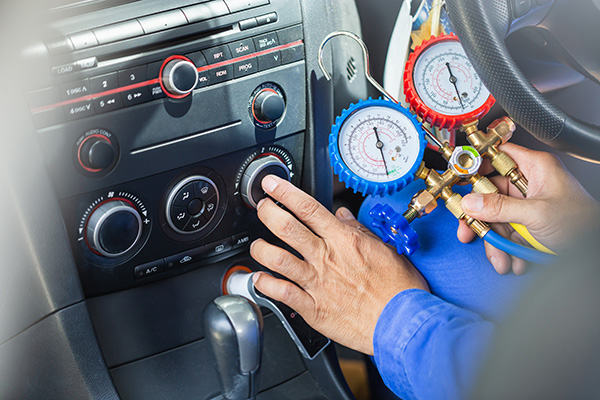
Step 5: Test Refrigerant Pressure
Using a refrigerant manifold gauge set (available at auto parts stores):
-
Connect the gauge to the low-pressure service port
-
Check the pressure reading against your vehicle manufacturer’s specifications
-
Low pressure indicates a leak; high pressure may indicate a blockage
Step 6: Listen for Unusual Noises
-
Rapid clicking from the compressor suggests low refrigerant
-
Clicking from behind the dashboard points to a blend door actuator issue
-
Grinding or rattling noises may indicate a failing compressor
DIY Repairs vs. Professional Service
Not all AC problems require a trip to the mechanic. Here’s how to decide which approach is right for you.
Repairs You Can Do Yourself
| Repair | Difficulty | Cost |
|---|---|---|
| Replace cabin air filter | Easy | $15–$40 |
| Clean condenser | Easy | Free–$20 |
| Replace AC fuse/relay | Easy | $5–$20 |
| Recharge with DIY kit | Moderate | $40–$80 |
Important caution about DIY recharging: While DIY recharge kits are tempting, they carry significant risks. AC systems are closed loops—if refrigerant is low, there’s a leak. Simply adding refrigerant without fixing the leak is a temporary fix that’s also environmentally irresponsible. Additionally, overcharging the system can cause serious damage.
When to Call a Professional
| Repair | Typical Cost Range |
|---|---|
| Professional AC recharge | $150–$350 |
| Compressor replacement | $1,000–$2,500 |
| Evaporator replacement | $1,200–$1,800+ |
| Condenser replacement | $400–$900 |
| Leak repair (hoses, seals) | $200–$600 |
Professional mechanics have specialized tools that DIYers typically don’t own:
-
Electronic leak detectors (“sniffers”)
-
Manifold gauge sets for accurate pressure testing
-
Vacuum pumps for proper system evacuation
-
UV dye kits for pinpointing leaks
The Environmental Consideration
Refrigerants used in automotive AC systems cause substantial environmental harm if released into the atmosphere. According to the California Air Resources Board, the gas contained in one 12-ounce container of R-134a refrigerant is equivalent to the CO2 emissions from burning 150 gallons of gasoline. This is why it’s illegal to intentionally release refrigerant into the air. Always have refrigerant handled by professionals who can properly recover and recycle it.
Understanding Refrigerant Types
The type of refrigerant your vehicle uses significantly impacts repair costs.
| Refrigerant | Used In | Recharge Cost |
|---|---|---|
| R-134a | Most vehicles before ~2013 | $205–$212 |
| R-1234yf | Most vehicles 2013 and newer | $250–$500+ |
R-1234yf is more environmentally friendly but significantly more expensive than R-134a. Always check your owner’s manual or the label under the hood to confirm which refrigerant your vehicle requires—using the wrong type can damage the system.
Preventive Maintenance Tips
The best way to avoid expensive a/c vehicle repair is through regular maintenance.
Annual System Check
Have a professional inspect your AC system annually, ideally in spring before the hot weather arrives. This should include:
-
Refrigerant level check
-
Visual inspection for leaks
-
Compressor operation test
-
Cabin air filter replacement
Keep the Condenser Clean
Regularly inspect the condenser (visible through the front grille) and remove any debris. A quick rinse with a garden hose can prevent airflow restrictions.
Run the AC Regularly
Even during colder months, run your AC for 10–15 minutes every few weeks. This keeps the compressor seals lubricated and prevents them from drying out and leaking.
Replace the Cabin Air Filter on Schedule
Don’t overlook this simple maintenance item. A clean filter ensures proper airflow and reduces strain on the entire system.
Real-World Repair Scenarios
Scenario 1: The Gradual Decline
Sarah notices her 2015 sedan’s AC isn’t as cold as it used to be. Over several weeks, it progresses from cool to barely cold.
Diagnosis: Low refrigerant due to a slow leak.
Solution: A professional leak test reveals a leaking O-ring at a hose connection. The O-ring is replaced, the system is evacuated and recharged with the correct amount of refrigerant. Total cost: approximately $250.
Lesson: Gradual cooling loss almost always indicates a refrigerant leak. Addressing it early prevents compressor damage from running the system with insufficient refrigerant.
Scenario 2: The Sudden Failure
Mike starts his truck on a 95-degree day and the AC blows nothing but hot air. He hears a clicking sound from under the hood but no cold air.
Diagnosis: Failed AC compressor clutch.
Solution: The compressor is replaced along with the receiver-drier and expansion valve. Total cost: approximately $1,400.
Lesson: Sudden failure with unusual noises typically points to the compressor. Replacing associated components during compressor replacement is recommended to prevent future problems.
Scenario 3: The Idle Problem
Jenna’s SUV blows cold air while driving but warms up when stopped at traffic lights.
Diagnosis: Faulty cooling fan not drawing air across the condenser at idle.
Solution: Replacing the cooling fan motor restores proper airflow. Total cost: approximately $300–$500.
Lesson: If cooling depends on vehicle speed, the issue is almost always airflow-related—either a fan problem or a clogged condenser.
Scenario 4: The Temperature Imbalance
David’s car blows cold air on the passenger side but warm air on the driver’s side.
Diagnosis: Broken blend door actuator.
Solution: Replacing the blend door actuator restores proper temperature control.
Lesson: Temperature differences between vents point to an actuator or blend door issue, not a refrigerant problem.
Cost Comparison: DIY vs. Professional
| Repair | DIY Cost | Professional Cost | DIY Feasibility |
|---|---|---|---|
| Cabin air filter | $15–$40 | $60–$120 | Excellent |
| Clean condenser | Free | $100–$200 | Good |
| Recharge with leak sealant | $40–$80 | Not recommended | Fair (risky) |
| Professional recharge w/ leak detection | N/A | $200–$350 | Not DIY |
| Compressor replacement | $400–$800 (parts only) | $1,200–$2,500 | Difficult |
| Evaporator replacement | $300–$600 (parts only) | $1,500–$2,500 | Very difficult |
Frequently Asked Questions
Why is my car AC blowing cold air sometimes but not others?
Intermittent cooling often indicates low refrigerant, a failing compressor clutch, or an electrical issue like a faulty pressure switch. The system may work when refrigerant pressure is adequate but cut out when it drops below a threshold.
Can I just add refrigerant myself?
Yes, but with significant caveats. DIY recharge kits cost $40–$80 and can provide temporary relief. However, if your system has a leak (which is almost always the case when refrigerant is low), the refrigerant will escape again. Additionally, overcharging is easy and can damage the system. For a proper fix, have a professional find and repair the leak first.
How long does a car AC recharge take?
A professional recharge typically takes 1–2 hours. This includes leak detection, system evacuation, and recharging with the correct amount of refrigerant.
Why does my AC only work when I’m driving?
This usually points to a cooling fan issue or a clogged condenser. When you’re driving, air flows naturally through the condenser. At idle, the fans must provide that airflow. If they aren’t working, cooling stops.
How often should I recharge my car AC?
In a properly sealed system, you should never need to recharge the AC. If the system is losing refrigerant, there’s a leak that needs repair. “Topping off” refrigerant is a temporary fix, not a maintenance item.
Conclusion
A car A/C system that isn’t blowing cold air is more than just an inconvenience—it can make summer driving unbearable and potentially lead to expensive repairs if ignored. Understanding the common causes—from low refrigerant and failing compressors to clogged filters and electrical issues—empowers you to make informed decisions about a/c vehicle repair.
Key takeaways:
-
Diagnose before you repair. Follow the systematic steps outlined in this guide to identify the root cause rather than guessing.
-
Don’t ignore gradual cooling loss. It almost always indicates a leak that will only get worse.
-
Consider the environmental impact. Refrigerant releases are illegal and harmful. Always use certified professionals for refrigerant handling.
-
Know when to DIY and when to call a pro. Simple tasks like changing the cabin air filter or cleaning the condenser are great DIY projects. Compressor or evaporator repairs require professional expertise.
-
Preventive maintenance saves money. Annual inspections and regular filter changes cost far less than major repairs.
-
Know your refrigerant type. R-1234yf systems cost significantly more to service than R-134a systems.
-
Address leaks properly. Adding refrigerant without fixing the underlying leak is throwing money away and harming the environment.
Related posts:
![Engine Repair ifixit.org.uk]()
How Do You Know When It Is Time for a Professional Engine Repair?
![AEE Mach 1 Troubleshooting ifixit.org.uk]()
How Can You Troubleshoot Common AEE Mach 1 Problems and Get Your Action Camera Working Again?
![Why Is My TH700R4 Transmission Shifting From 1st Gear Directly to 3rd Gear and How Can I Fix It]()
Why Is My TH700R4 Transmission Shifting From 1st Gear Directly to 3rd Gear and How Can I Fix It?
![Car and Truck Wiper Blades Replacement ; ifixit.org.uk]()
How Do You Replace Car and Truck Wiper Blades and Choose the Right Size for Your Vehicle?